Title: Enhancing a web application by using the Azure Content Delivery Network
Introduction: All my articles are compiled into simple steps with detailed screen shots and elaborative description. By following these steps even, a novice programmer should be able to replicate scenario. Please go through the steps and provide your valuable feedback to make my next articles more clearer and intent.
Note: I took help of various internet sources while researching this item. Credit goes to internet and Microsoft communities. This is one of the topics in Azure certification.
This is my 15th article on Azure.
Please follow below links for my previous Azure articles
Follow below mentioned steps to improve performance of web application using Azure CDN end points.
What is CDN? Azure Content Delivery Network (CDN) lets you reduce load times, save bandwidth, and speed responsiveness—whether you’re developing or managing websites or mobile apps, or encoding and distributing streaming media, gaming software, firmware updates, or IoT endpoints.
After completing this blog, you will be able to do
Create Web application
Create CDN profile
Define end points for CDN
Use these endpoints in web application
Sample Description: We are going to create a web application and a storage account. We will create a CDN profile. Define endpoints for CDN and use them to map storage account and web application.
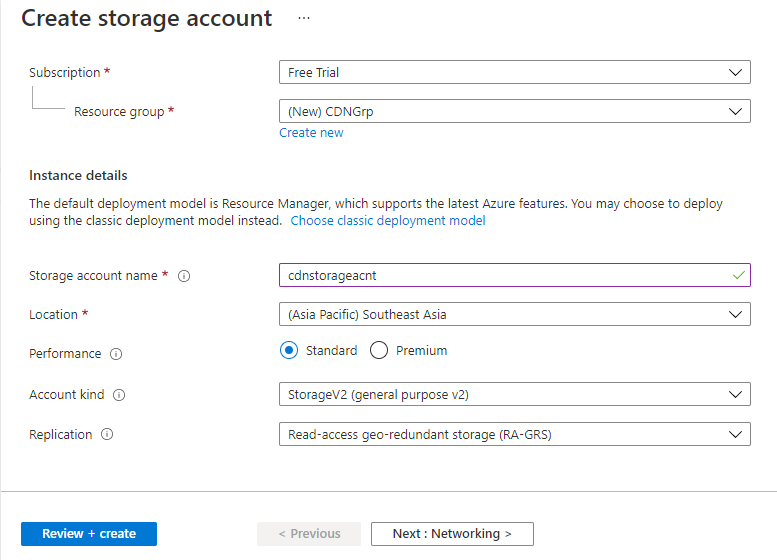
Step 2: Create a storage account. We will use this storage account to store our multimedia content like images and videos.
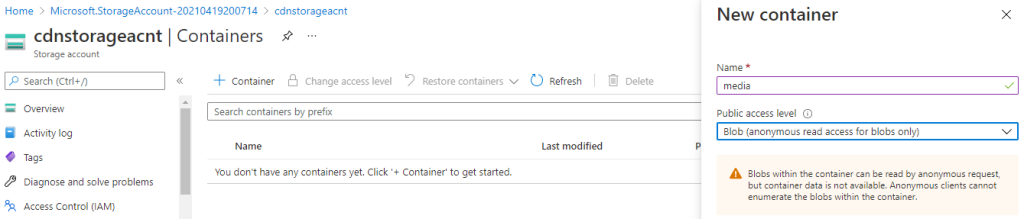
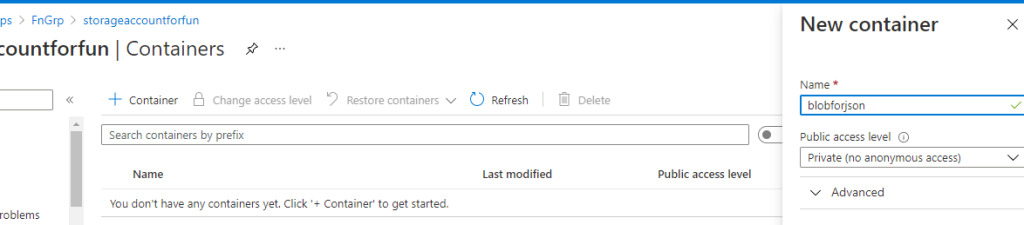
Step 3: Access the storage account created in previous step and create a blob container.
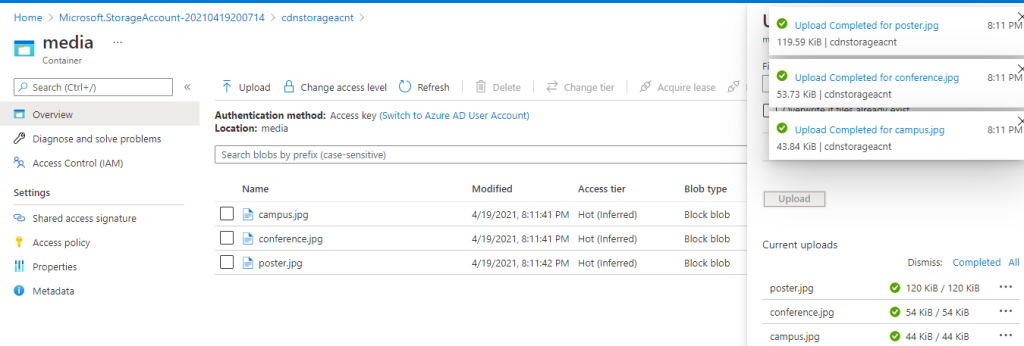
Step 4: Access blob container and upload images.
Step 5: Go to properties blade of the blob container and record the value of the URL. We will use this value in later steps.
Step 6: Create another blob and upload the video in to it. Repeat the steps 3,4 & 5.
Step 7: Now we will work on CDN part. First, we need to register CDN provider.
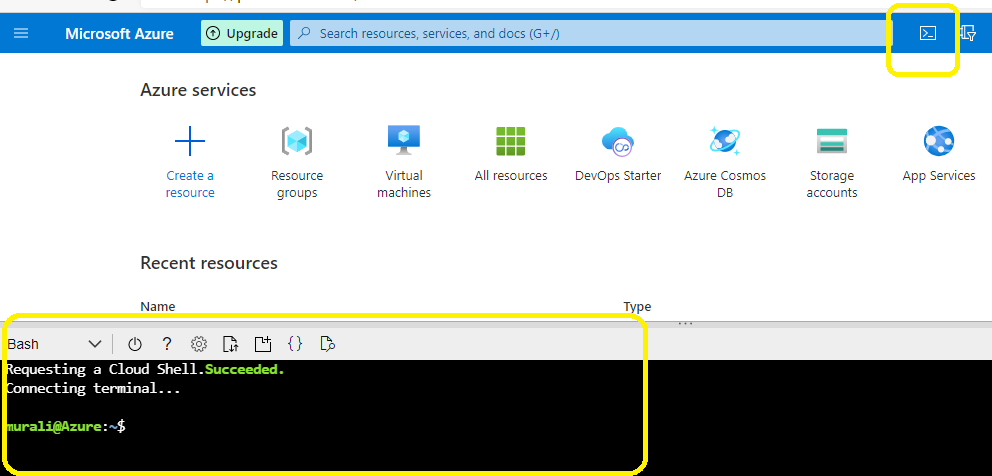
Open the cloud shell from azure portal. If you are accessing it for first time, it will ask for the configuration. Go ahead and configure.
User below command to register CDN. Registering CDN provider is important, so that we can use this in next steps.
“az provider register –namespace Microsoft.CDN”
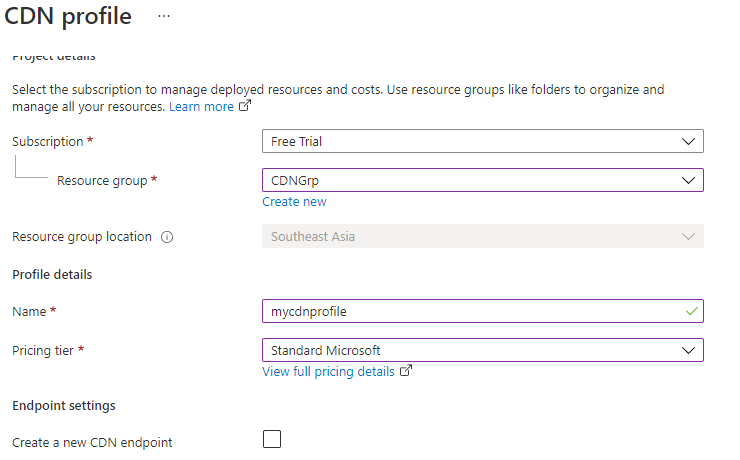
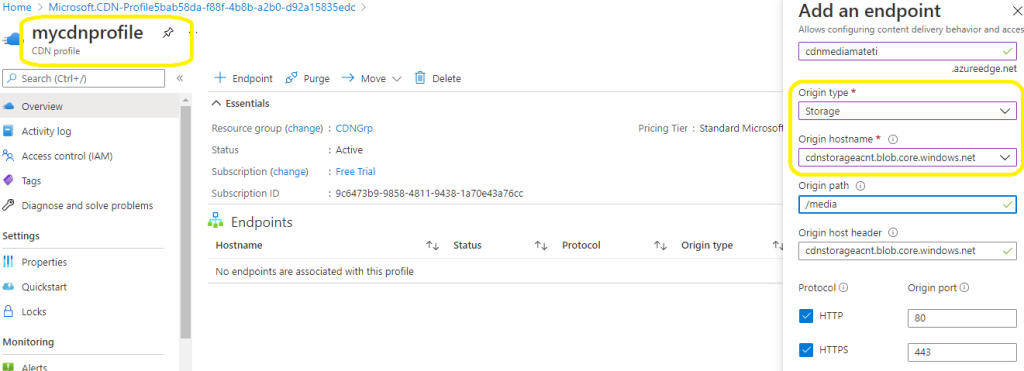
Step 8: Go to azure portal and create a Content Delivery Network profile as shown below.
Search with Keyword “CDN” and click on create.
Step 9: CDN is ready. Now we need to create endpoints for CDN. Access CDN, we created in earlier step and define endpoints. If you select origin type as storage, it will show storage account we created earlier.
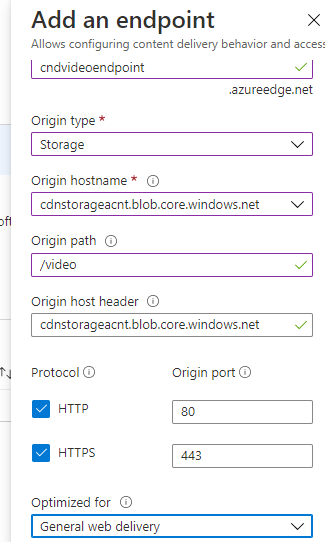
Step 10: Create another end point for video as show similar above.
In previous step and this step, we are creating 2 endpoints- 1 for media blob and other for video blob.
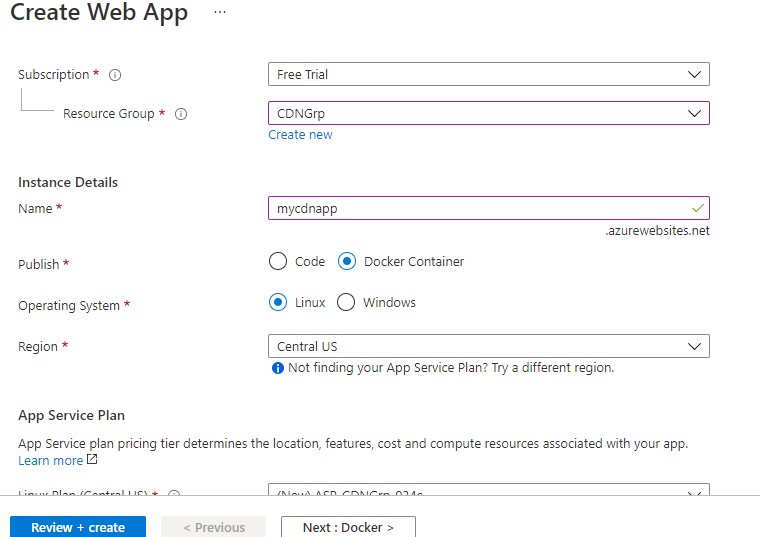
Step 11: Go to azure portal and create a web application. This will application will retrieve the content from storage account and displays.
Step 12: After creating web application access, go to properties blade and copy the URL.
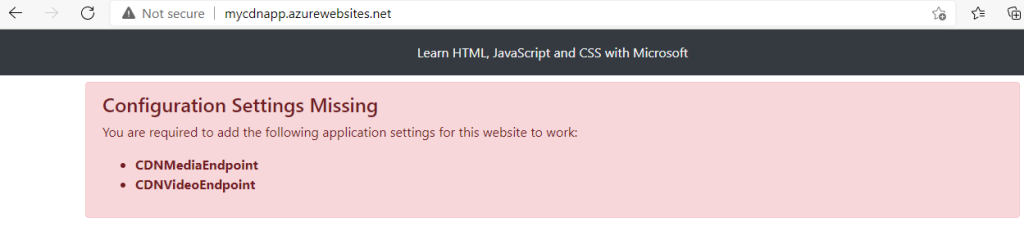
Step 13: Access web app create in previous step and you will see error messages and mentioned below. Until you fix these error messages your web app will not work
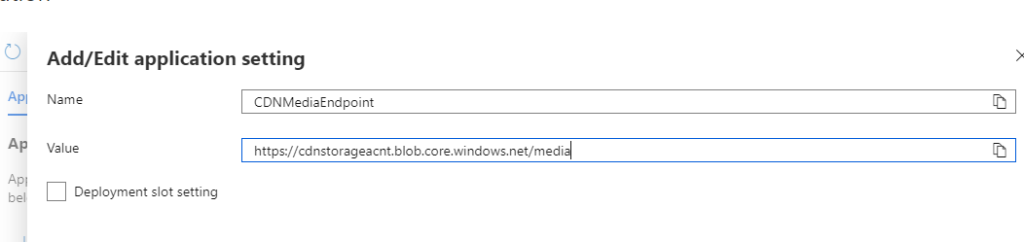
Step 14: Go to web application> Settings> Configuration and create a “New application setting”. Provide the url of the media blob we created in previous steps.
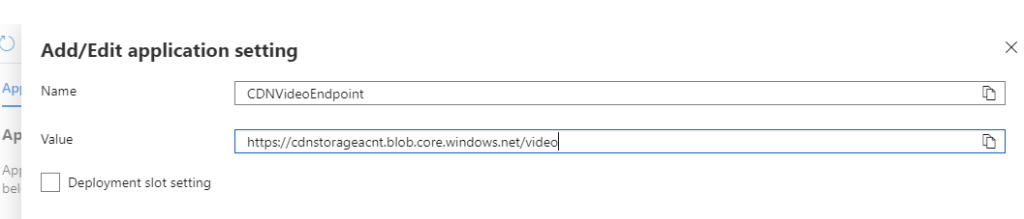
Step 15: create one more application setting entry for video content as shown below. Finally save configuration tab.
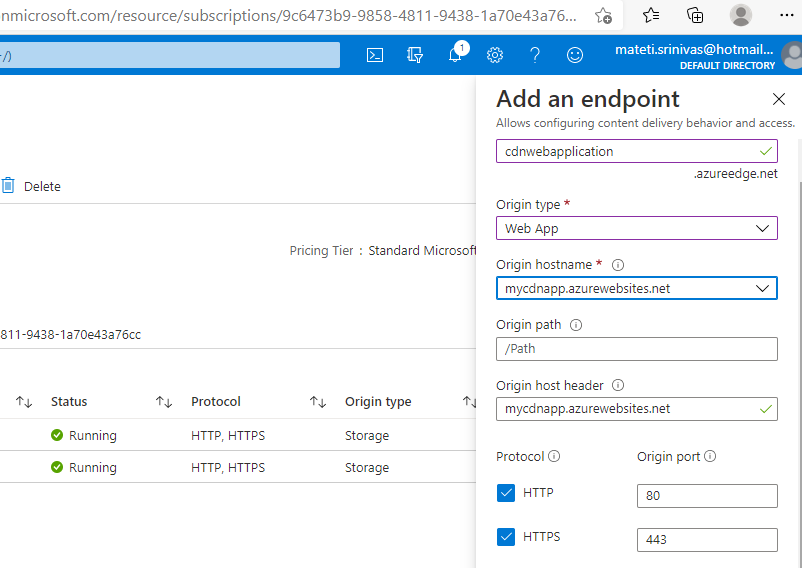
Step 16: Add a new endpoint to CND with web application URL
Step 17: Now you access application and it will show the content. Web application is pulling data from storage account by using CND endpoints.
We have seen how to build applications and configure CDN endpoints to pull and display data.
Introduction: All my articles are compiled into simple steps with detailed screen shots and elaborative description. By following these steps even, a novice programmer should be able to replicate scenario. Please go through the steps and provide your valuable feedback to make my next articles more clearer and intent.
Note: I took help of various internet sources while researching this item. Credit goes to internet and Microsoft communities. This is one of the topics in Azure certification.
This is my 14th article on Azure.
Please follow below links for my previous Azure articles
Follow below mentioned 21 steps to manipulate incoming request and out going responses of an api using proxy of API management in azure.
After completing this blog, you will be able to do
Create API management resource and integrate it with Azure web app
Define or add custom headers for API
Modify API response before sending it to client
Host web app in Docker container
Configure API as proxy for another azure service with header and payload manipulation
Sample Description: Create a web app and deploy using docker container. Define API proxy by using API management- add custom headers and manipulate the response format.
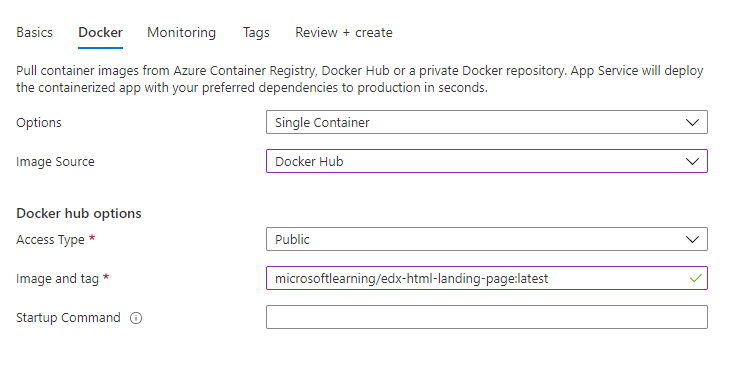
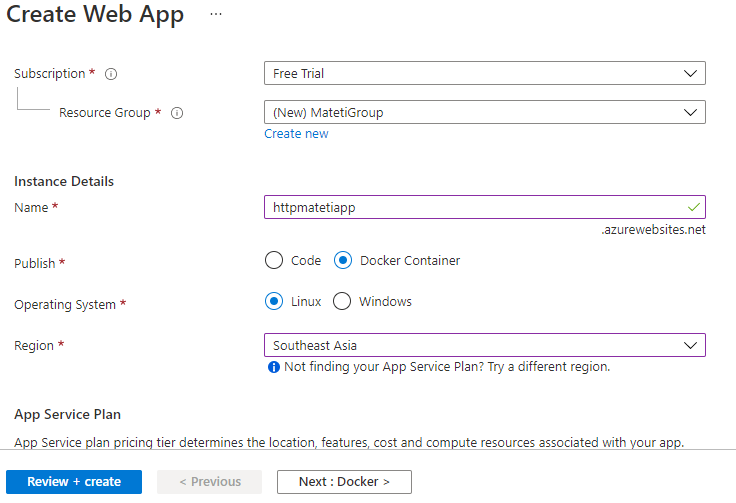
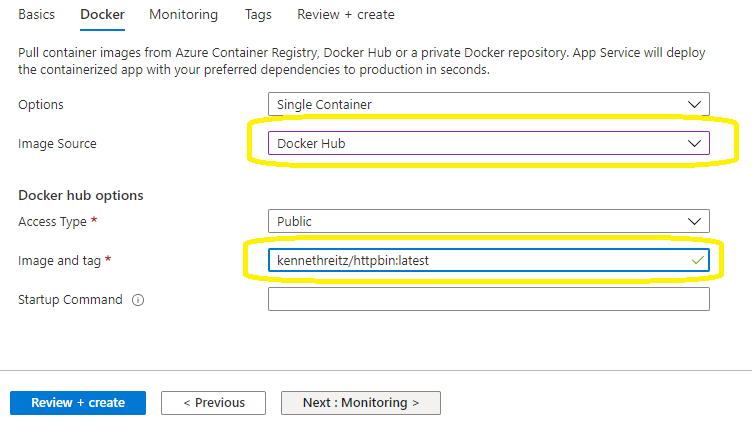
Step 2: Create a new web app. This time we are going to publish the web application using docket container. Please select values as highlighted In below image. Select Image source as docker hub and provide image tag as “kennethreitz/httpbin:latest”
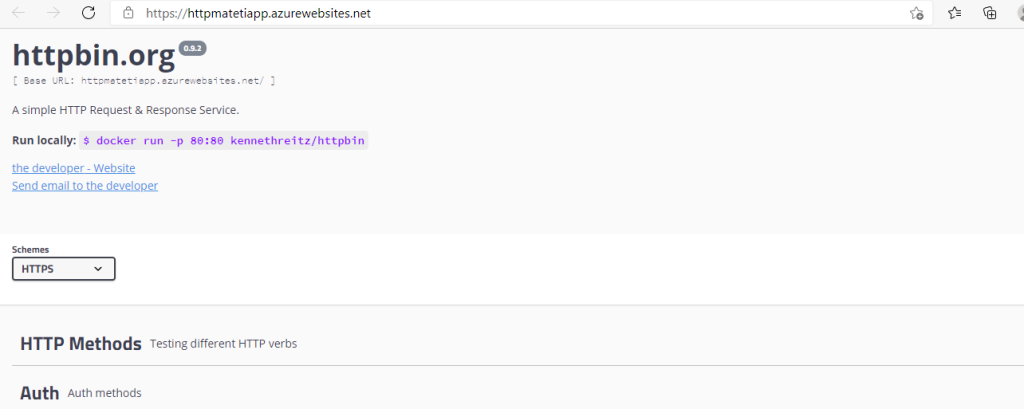
Step 3: Access the web app you created and browse it.
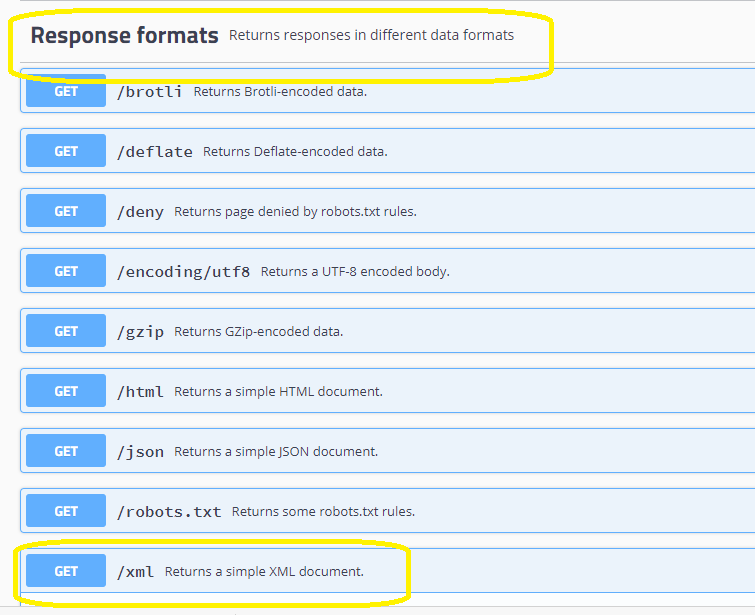
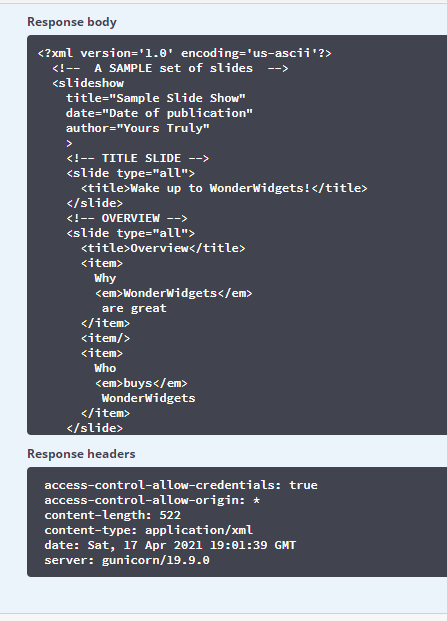
Step 4: Now we will observer different parts of this web app. Expand Response formats section and click on Get/Xml button
Step 5: Click on Try it our button
Step 6: If you click on Execute button, it will load response body and headers of this particular web application. Please observe them.
Step 7: In next steps we are going to override these headers and response by using proxy tier which is nothing but API management
Step 8: Now go back to wee application > Properties blade and collect the value from URL. This value we will use in next steps.
Step 9: Now create a API management resource as shown below
Step 10: Now we are going to create an api in API management. While creating API in API management give the URL of Web application, we created in step 2. In this step we are binding web application with API management proxy
Access API Management we created in previous step. Click on API’s blade. Finally click on Blank API.
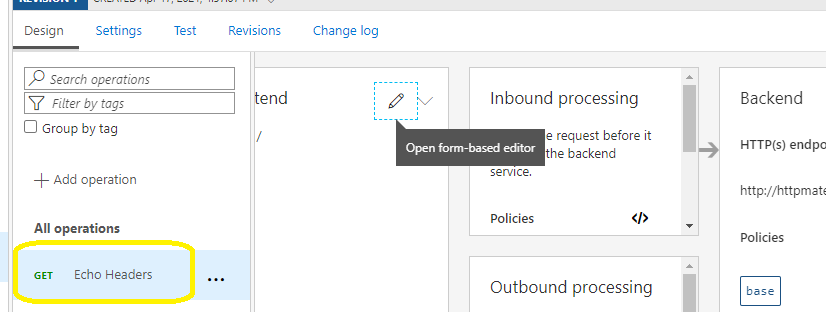
Step 11: Now we are going to define headers for API. Access the Blank API we created in previous step and click on Add Operation link. Create a header as mentioned below
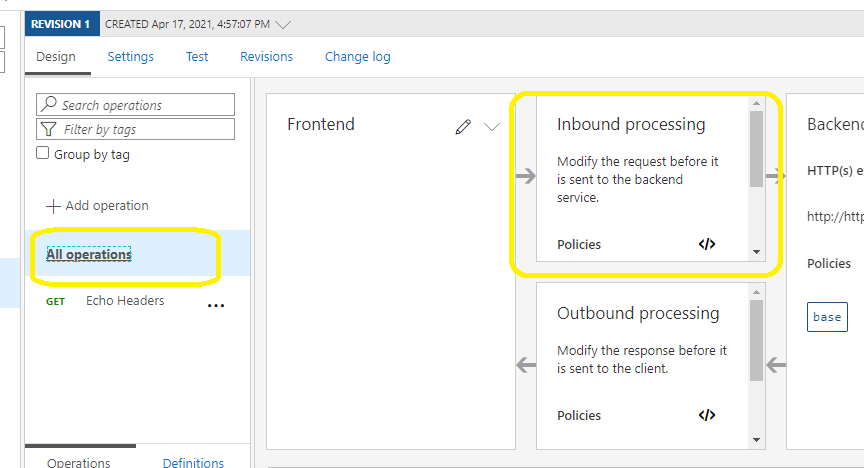
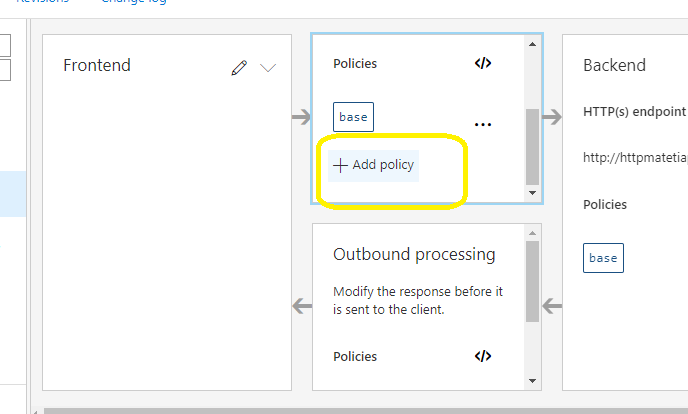
Step 12: In this step, we are going to create In bound policy to include or append header for all incoming request. Inbound processing is nothing but processing incoming request. Now I am going to define a policy which process each incoming request and appends header defined in previous step.
Click on All operations> Inbound Processing Box> Add Policy Link
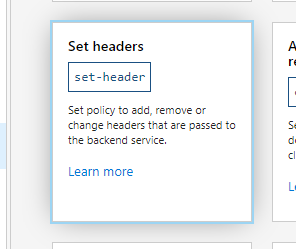
Step 13: Various policies are available. Search for Set headers policy and click on Set Header Link. Create policy as mentioned below.
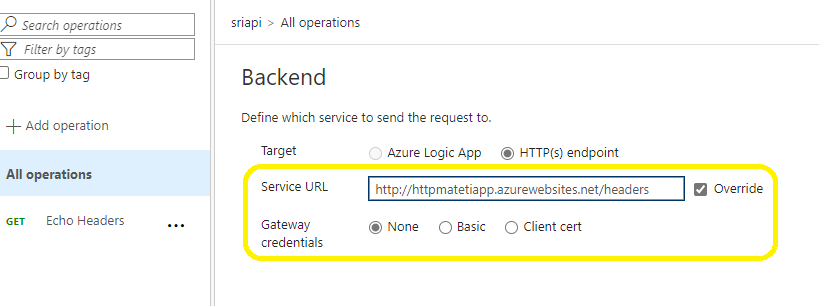
Step 14: Now go to Echo Headers> Backend Box and click on edit.
Step 15: Update the service URL by appending headers to it. Select Override check box.
Step 16: Test echo headers and observe the response. Lot of headers have been added as part of the response.
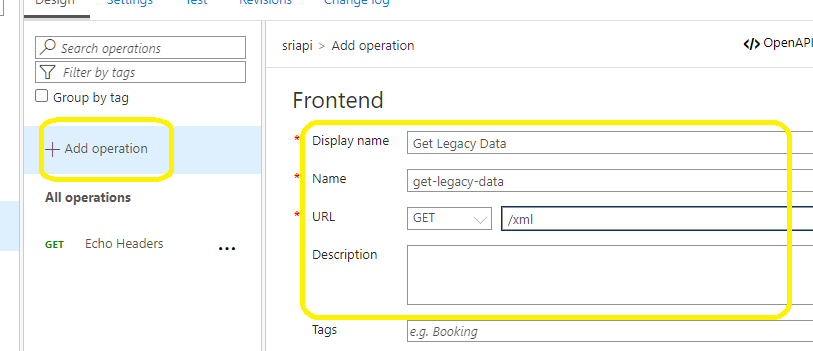
Step 17: Till now we have seen how to modify incoming request and add headers to it. Now we will see how to manipulate the response from API before sending it to requestor
Click on Add new operation and add one as shown below
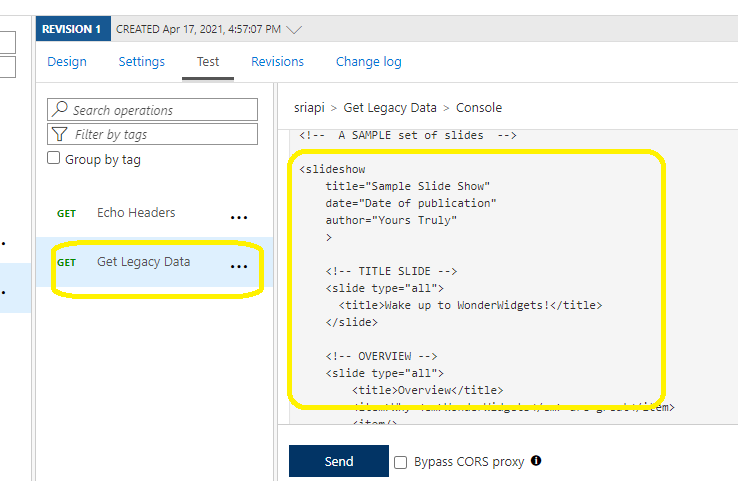
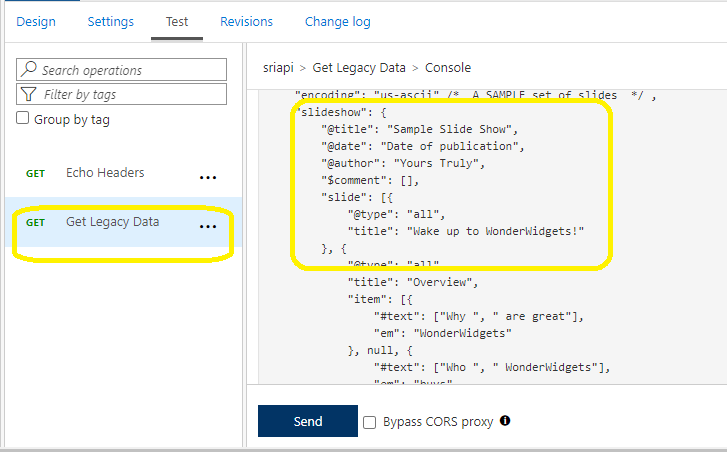
Step 18: Click on Operation we created in previous step and test it. Observe the result, Now out put should be in xml format.
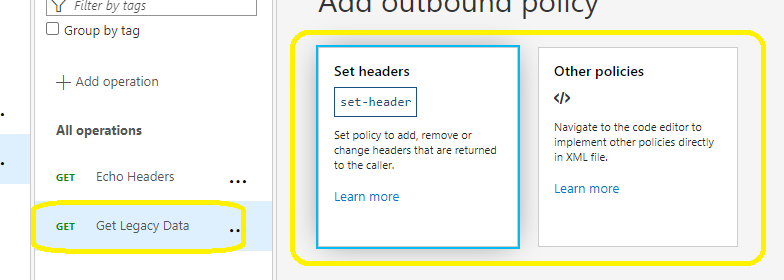
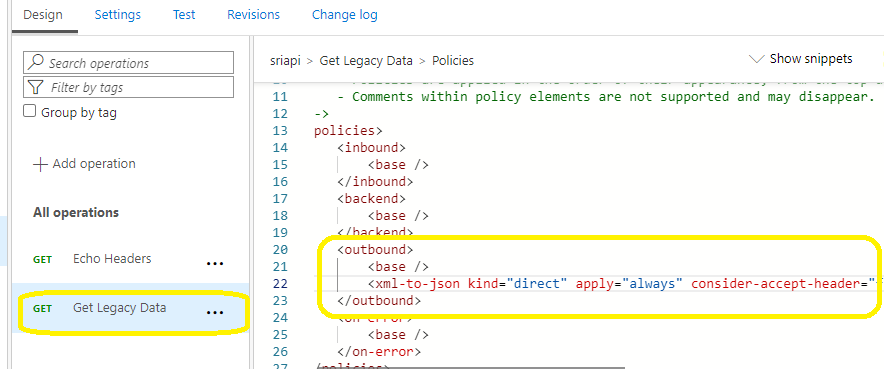
Step 19: Now define out bound custom policy for get Legacy Data operation as shown below
Step 20: Before click on Save add below mentioned line in <outbound> section and hit click.
Title: Deploying compute workloads by using images and containers
Introduction: All my articles are compiled into simple steps with detailed screen shots and elaborative description. By following these steps even, a novice programmer should be able to replicate scenario. Please go through the steps and provide your valuable feedback to make my next articles more clearer and intent.
This is my 13th article on Azure.
Please follow below links for my previous Azure articles
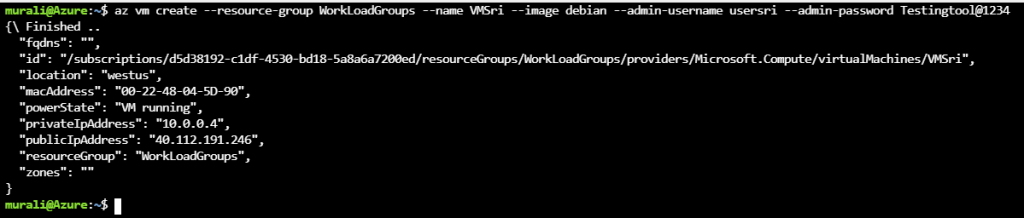
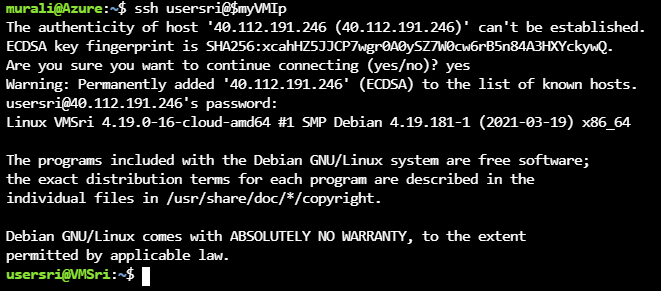
Step 6: Use below SSH command to connect to VM. It ask for login confirmation- anser yes. Then it will prompt for password. Provide the password. Finally it will connect you to virtual machine by using command line
Ssh usersri@$myVMIp
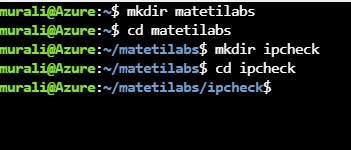
Step 7: In next steps we will we will create a console application using commands.
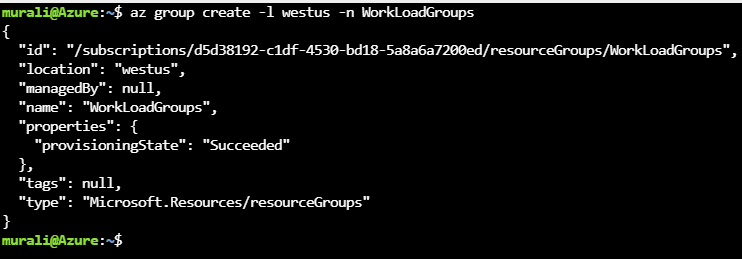
First create folder by using below command
Mkdir matetilabs
Then create another folder ipcheck using mkdir ipcheck
Navigate to ipcheck folder.
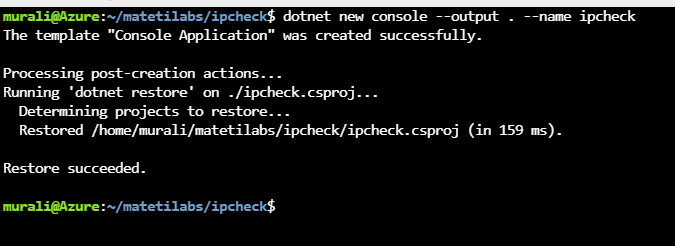
Step 8: Create new console application using below command
dotnet new console –output . –name ipcheck
Step 9: Add new file to newly created console app by using below command
Touch Dockerfile
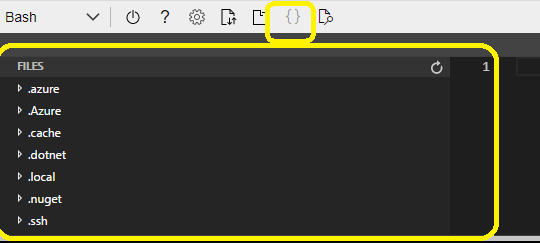
Step 10 : Now click on open editor icon in command prompt to launch editor in azure. Navigate to the project you create earlier.
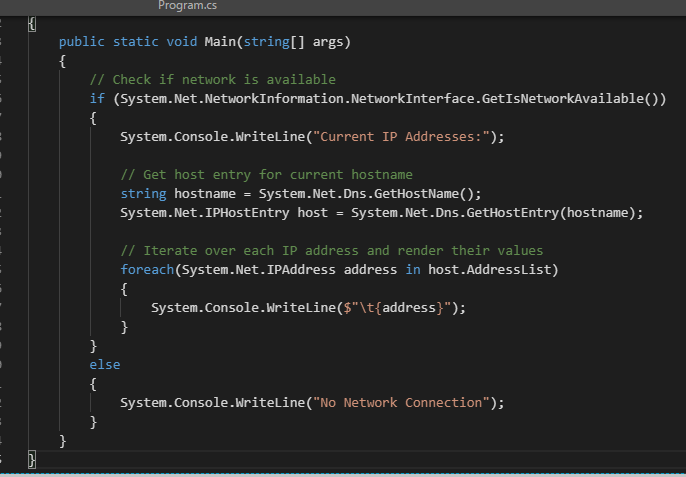
Step 11: Open Program.cs file and update the logic. Snap shot looks like below
Step 12: Open Docker file and update the content as shown below
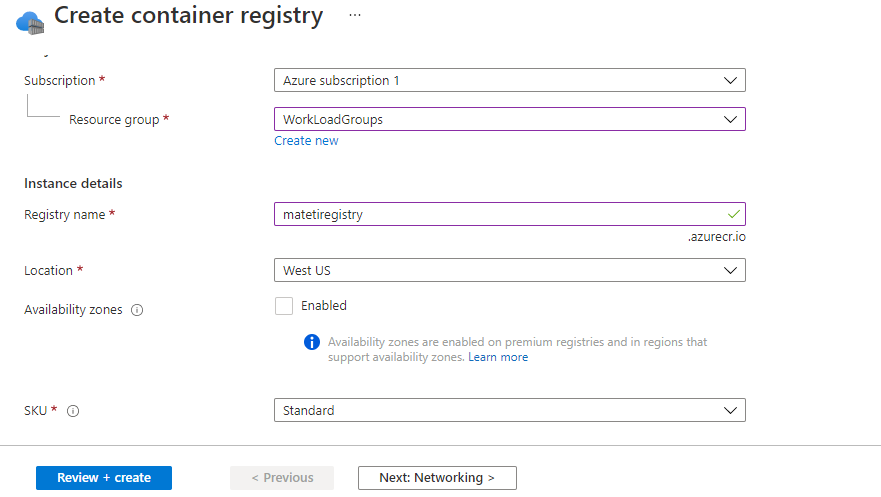
Step 13: Now go back to azure portal and create a new azure container registry as shown below
Step 14: Access the container created in above step. Go to repositories tab and look for the resources, it will be empty
Step 15: In next steps we are going to deploy application in the repository.
Use below command to read the name of the registry we created
az acr list –query “max_by([], &creationDate).name” –output tsv
Step 16: By using below command save name of the repository to command variable
acrName=$(az acr list –query “max_by([], &creationDate).name” –output tsv)
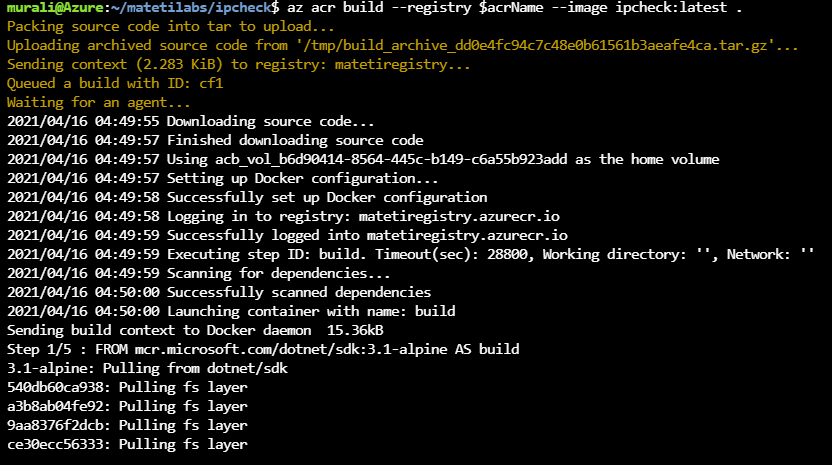
Step 17: Navigate to the application we created earlier. Then use below command to deploy application in to the registry we created.
az acr build –registry $acrName –image ipcheck:latest .
And application deployed successfully to registry.
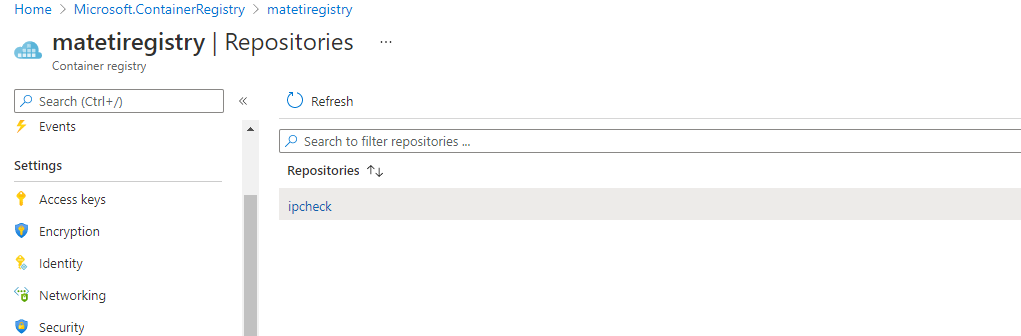
Step 18: Now go back to registry and refresh the repositories. You will see ipcheck got deployed there.
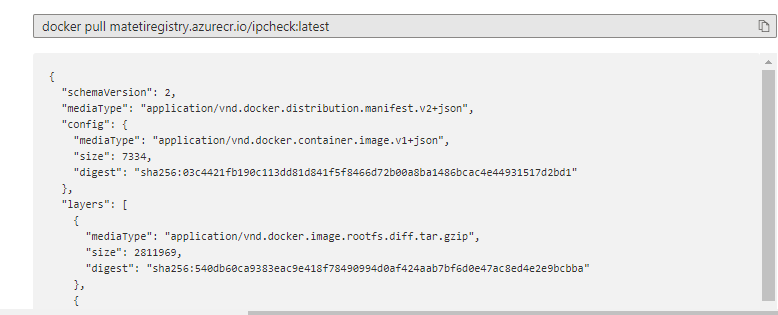
Step 19: Click on ipcheck and latest, you will see below json get generated from application.
Just now we have seen how to deploy resources in to containers using images.
Introduction: All my articles are compiled into simple steps with detailed screen shots and elaborative description. By following these steps even, a novice programmer should be able to replicate scenario. Please go through the steps and provide your valuable feedback to make my next articles more clearer and intent.
Note: I took help of various internet sources while researching this item. Credit goes to internet and Microsoft communities. This is one of the topics in Azure certification.
This is my 12th article on Azure.
Please follow below links for my previous Azure articles
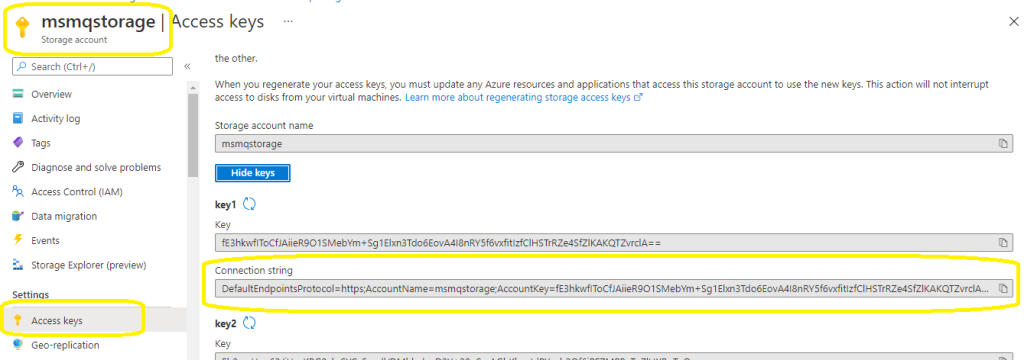
Step 3: Access storage account created in previous step. Go to Access Keys blade and collect connection string. This connection string will be used in next steps.
Step 4: Create blob and upload a json file. Function app we creates in next step will read this json file.
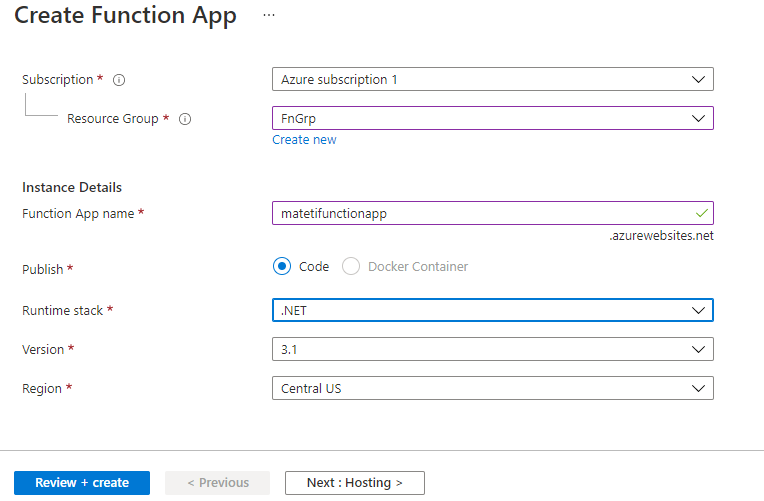
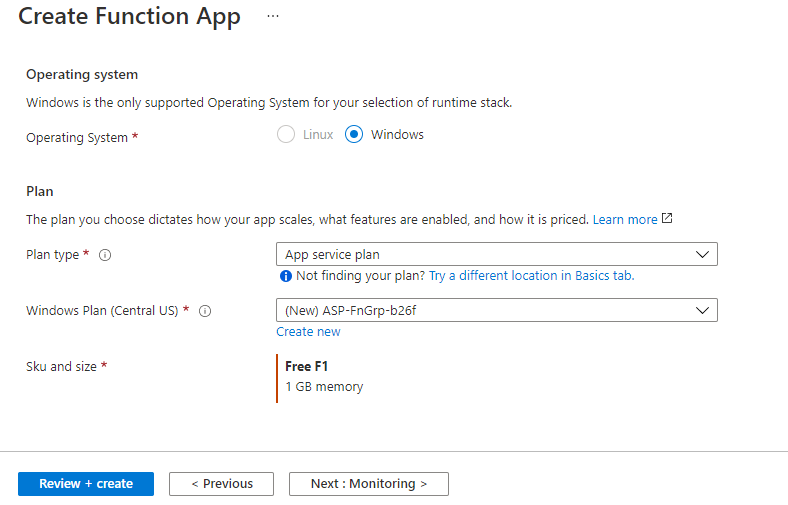
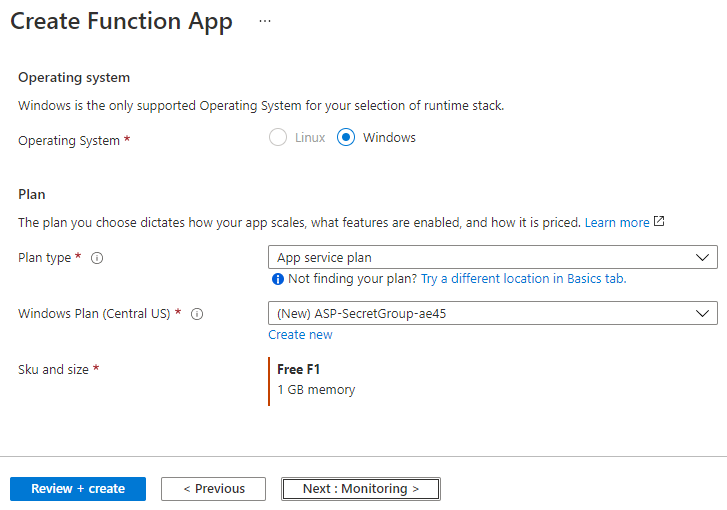
Step 5: Create a function app in portal as shown below.
Step 6: In next steps we are going to work on code part. Open visual studio and create function as by using below command.
func init –worker-runtime dotnet –force
Step 7: Open local settings file and update value of “AzureWebJobsStorage” property with the connection string we collected from storage account
Step 8: Now add a function trigger by executing below command
func new –template “HTTP trigger” –name “MatetiTrigger”
What if function Trigger? -Triggers will initiate the function app. Every function app must have at least one trigger. Triggers have associated data, which is often provided as the payload of the function.
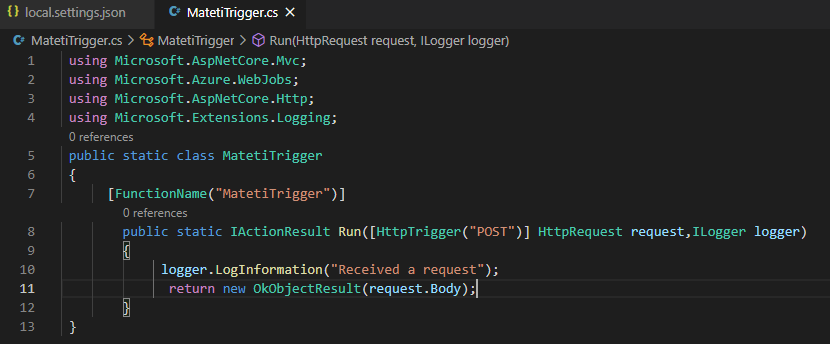
Step 9: Open newly added Trigger file and delete entire code in it. Then add below name spaces.
using Microsoft.AspNetCore.Mvc;
using Microsoft.Azure.WebJobs;
using Microsoft.AspNetCore.Http;
using Microsoft.Extensions.Logging;
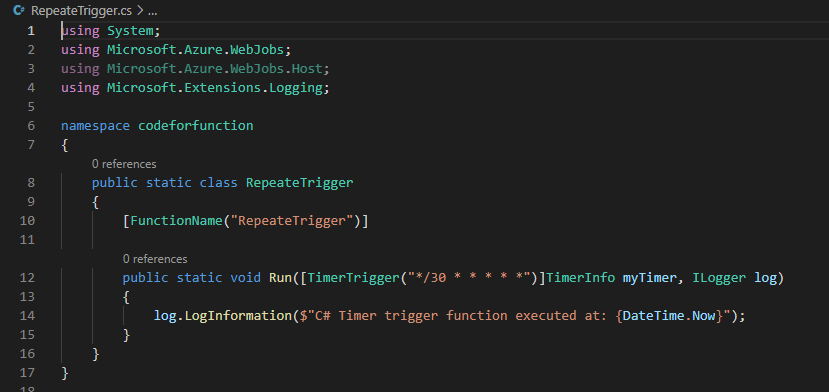
Step 10: Update Trigger file as shown in below image.
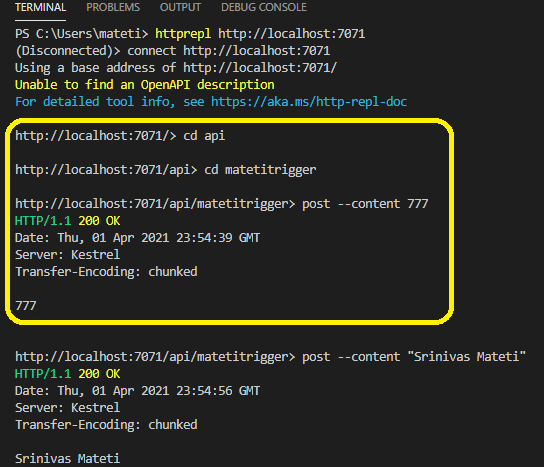
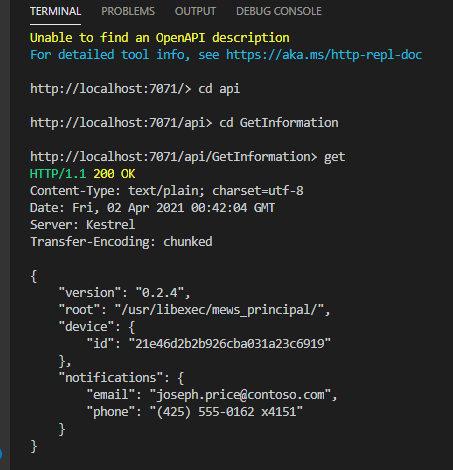
Step 11:Now its time to test our trigger.We will use HttpRepl to test it.
What is HttpRepl?- The ASP.NET team has built a command-line tool called HttpRepl. It lets you browse and invoke HTTP services in a similar way to working with files and folders. You give it a starting point (a base URL) and then you can execute commands like “dir” and “cd” to navigate your way around the API. HttpRepl stands for HTTP Read-Eval-Print Loop
Step 12: Deploy function app locally by using below command
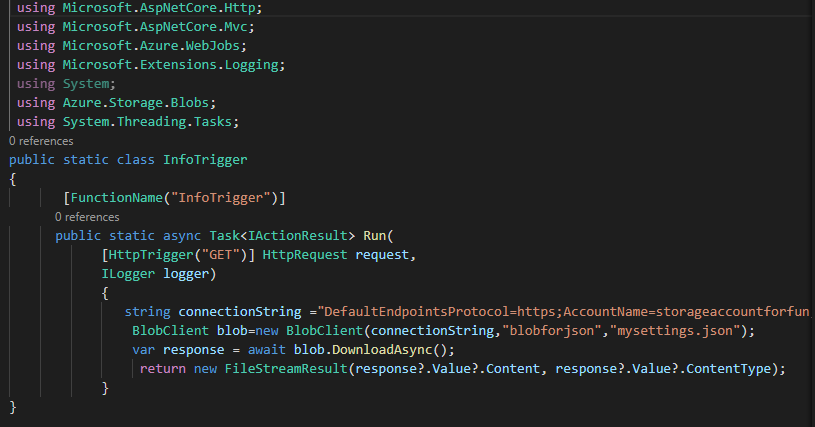
Below code is trying to connect the blob we created in previous steps and reading mysettings.json file content. This method is returning the content of json file.
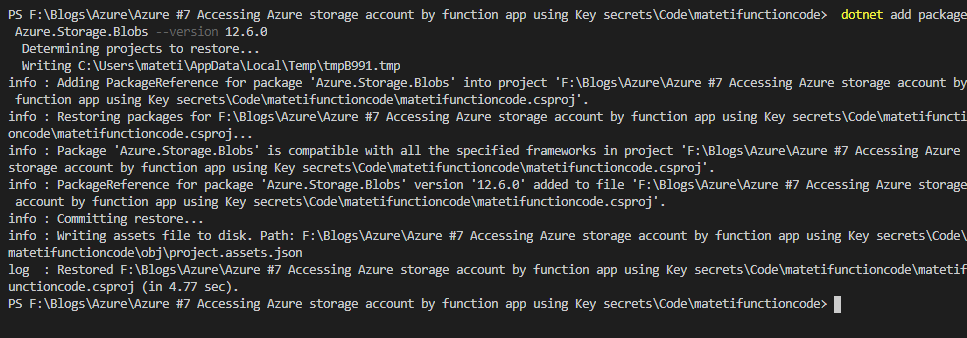
Step 19: As the blob is showing error, we need to install bolb package by using below mentioned nuget package.
Title: Accessing Azure storage account by function app using Key secrets
Introduction: All my articles are compiled into simple steps with detailed screen shots and elaborative description. By following these steps even, a novice programmer should be able to replicate scenario. Please go through the steps and provide your valuable feedback to make my next articles more clearer and intent.
Note: I took help of various internet sources while researching this item. Credit goes to internet and Microsoft communities. This is one of the topics in Azure certification.
This is my 11th article on Azure.
Please follow below links for my previous Azure articles
Follow below mentioned 32 steps to Access Azure storage account by function app using key vault secrets.
After completing this blog, you will be able to do
What is Azure function app
Creating and configuring azure secret keys
Configure connection strings by using keys
Providing access permissions to keys
Use keys to access resources by using function apps
Sample Description: We are storing a json file in blob container. Function app needs to read that json file. Connection string for this storage account will be exposed by defining a secret key. Function app access that secret to get connection string for storage account.
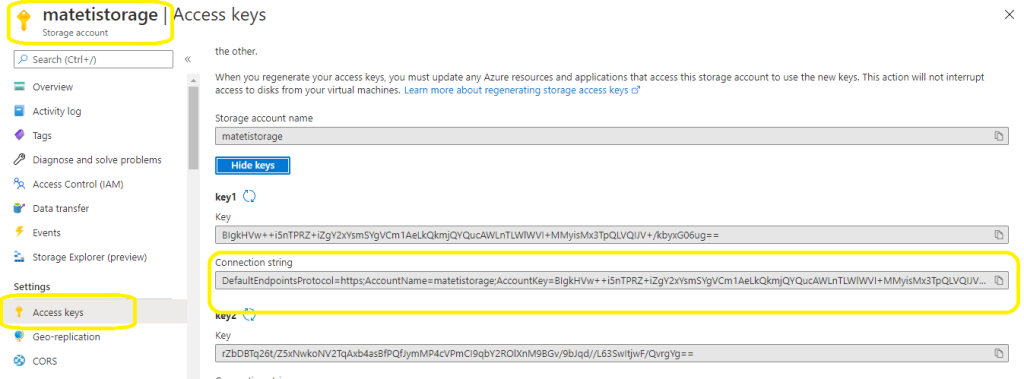
Step 3: Access storage account and collect connection string from keys blade. This connection string, we will use it in next steps to define our key vault.
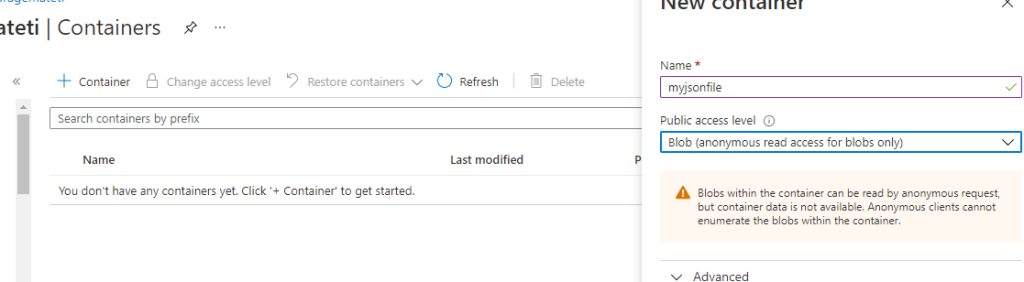
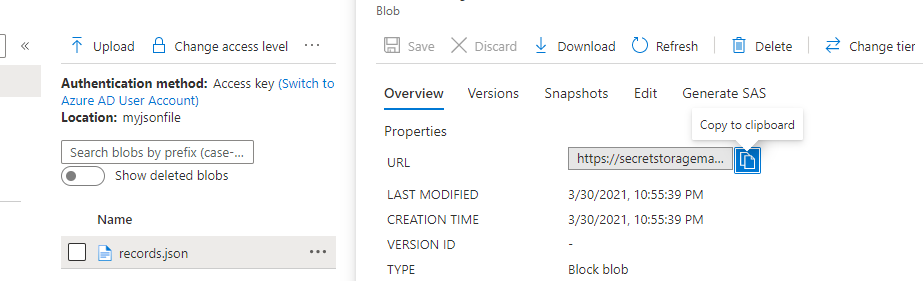
Step 4: Create a blob container and upload json file. Initially, blob anonymous access level. Later will change.
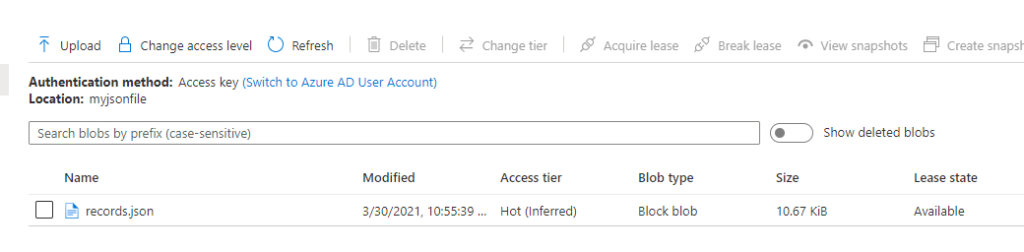
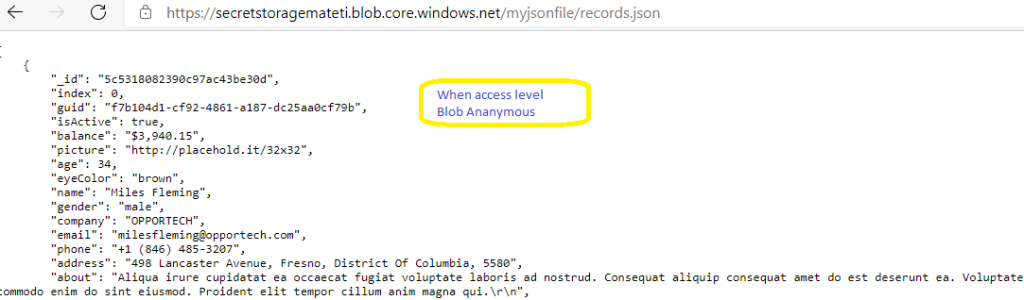
Step 5: Select the json uploaded in previous step> Copy URL
Step 6: Now try to access this json file by using URL. If access level is Blob anonymous, you can access the json by using URL. If access level is private, you cannot access by browsing URL. Please see below screen shots in both cases.
Step 7: I restricted my json file access. Outsiders can not access my json file by using its URL. My user application should read this json file from out side azure. To achieve this I will implement below steps.
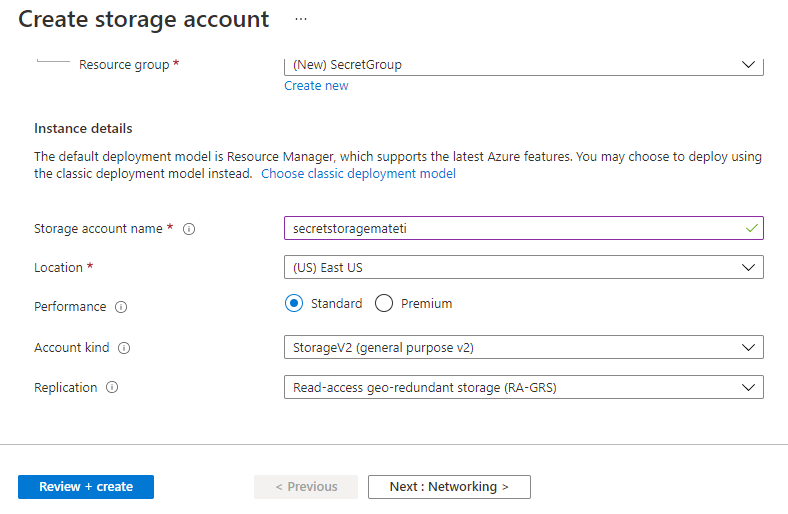
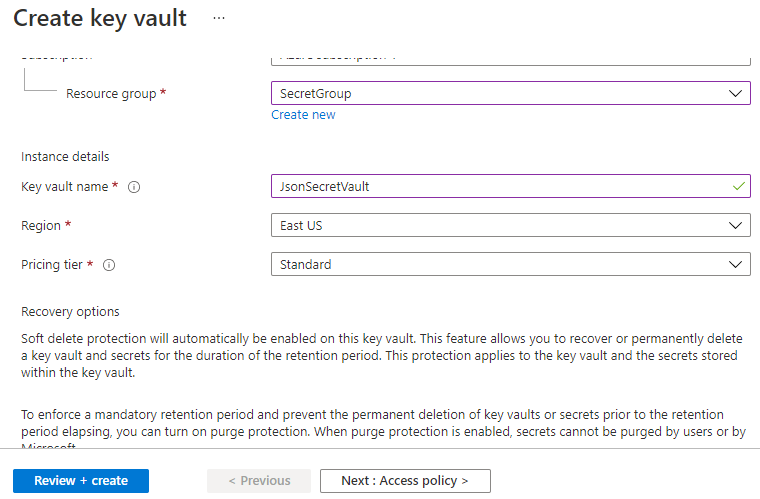
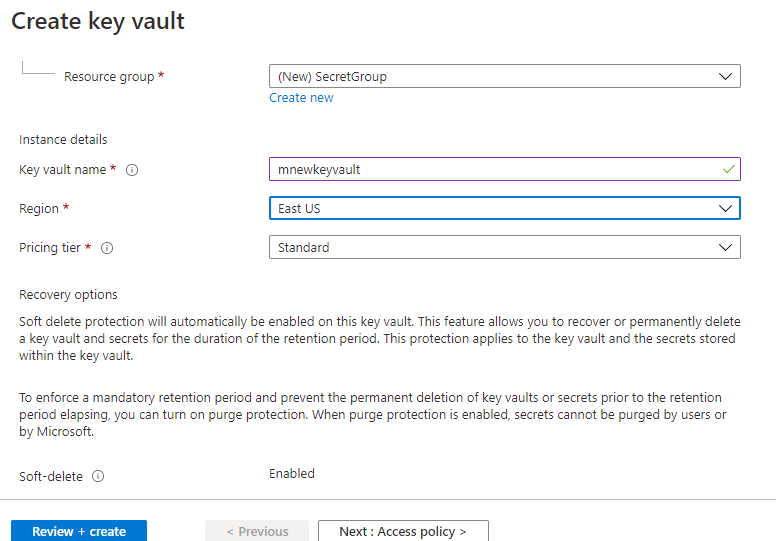
Step 8: Create a new key vault as shown below
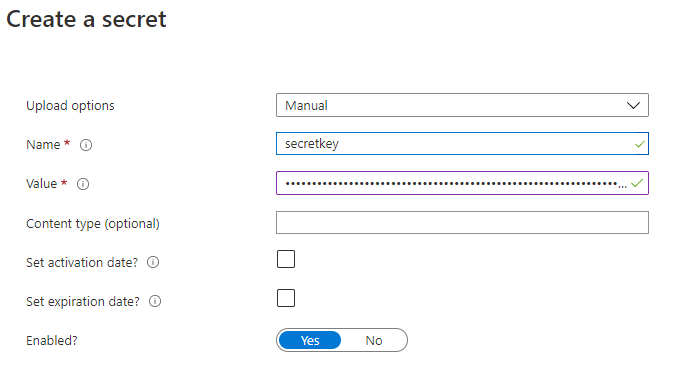
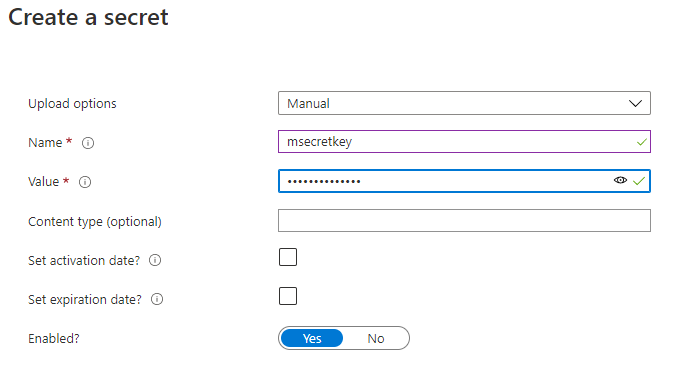
Step 9: Access key vault you created in earlier step and select secret blade. Create a new secret by clicking on Generate/Import button. In value field, provide the connection string we collected from step 3. Applications can read this connection string to get access to the storage account
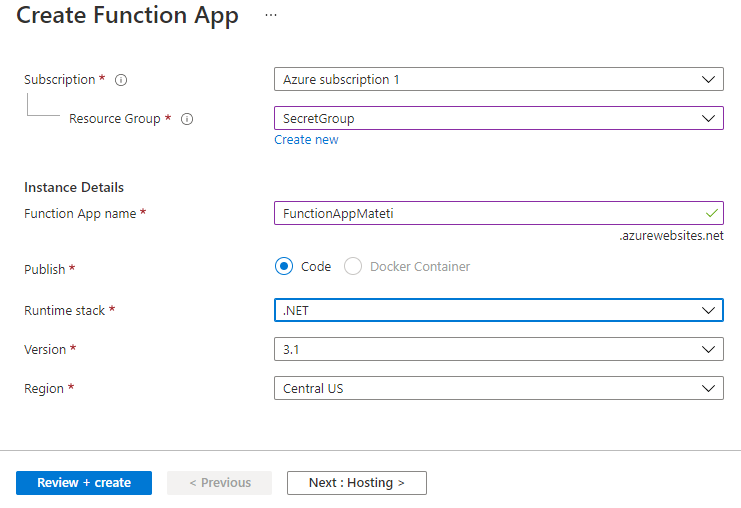
Step 10: Now we will create a azure function app which in later stages access the json file we created earlier. Copy function app name, we will use it in next steps.
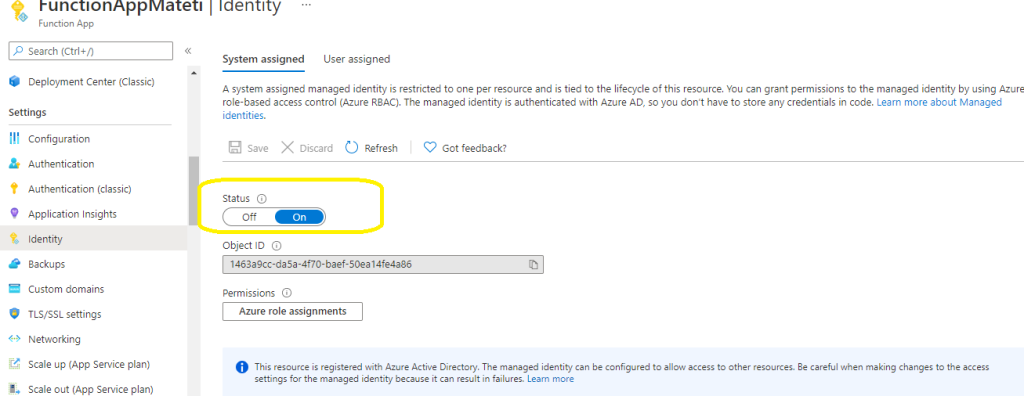
Step 11: Access the function app we created earlier and select identity blade from settings section. Enable System assigned managed identity and save your changes. This setting will allow other resources to access your function app and provide required accesses
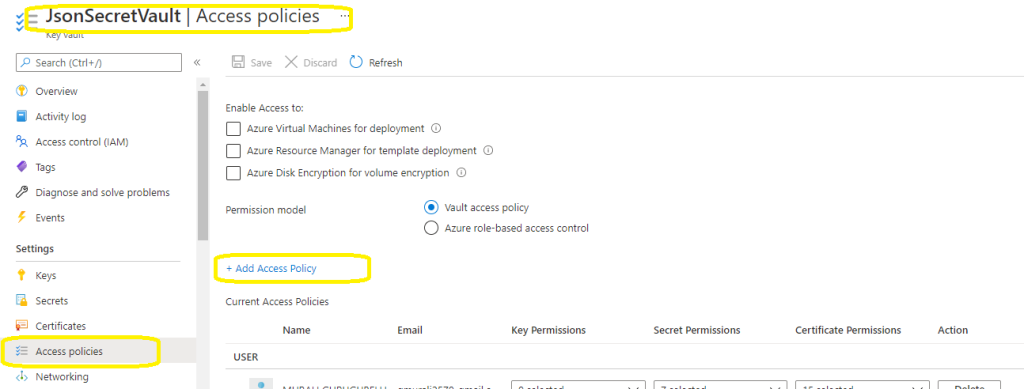
Step 12: In this step we are going to create an access policy in key vault. This access policy will allow function app to access the key vault and read the keys and secrets.
Access key vault and click on Access Policies blade.
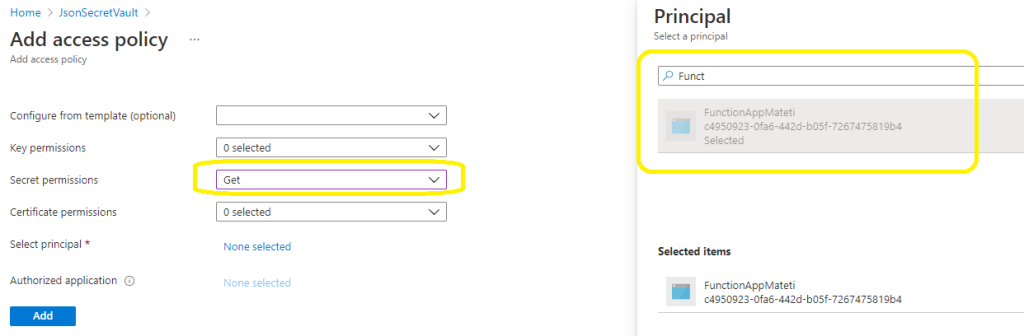
Step 13: Now click on new Access Policy link and provide access to function app.
As we are going to provide access to our secret keys, select Get Permission on Secret Permission dropdown. Click on Select Principal link and search for the function app we created and select.
Now your function app has been provisioned to access secret keys from the key vault.
Step 14: Now we need to work on code part of our function app. As I created my function app with .net core settings, I will develop and deploys a dot net core function app using visual studio code and dot net tools. First, I will demonstrate how function app is reading and displaying the connection string, then I will add the code to read and display the json file.
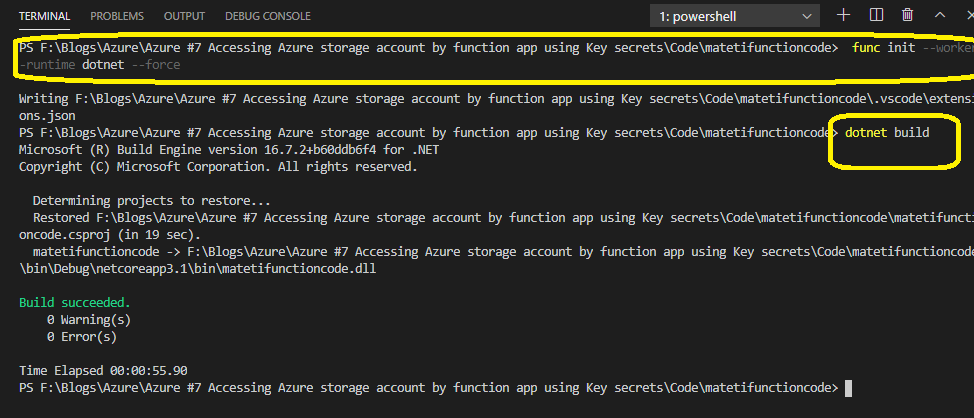
Step 15: Open a folder by using visual studio code. Open the terminal and execute below command. This command will create a function app project in the current folder.
func init –worker-runtime dotnet –force
After creating project execute dotnet build command to make sure everything is proper.
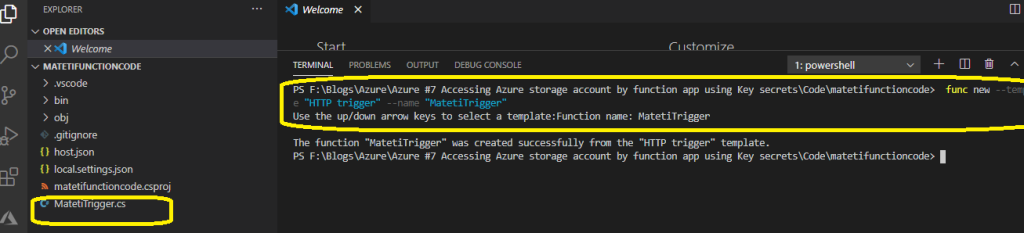
Step 16: Now we need to create a File by using HttpTrigger template. This file will be used to create Http Event and access information
Use below command to crate Http Trigger
func new –template “HTTP trigger” –name “MatetiTrigger”
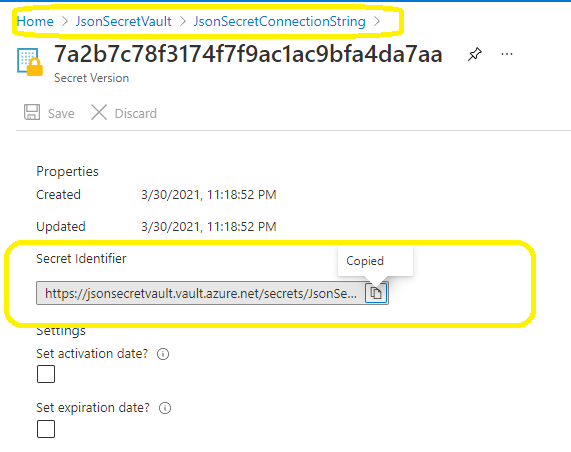
Step 17: Access secret key we created in earlier steps and collect Secret Identifier as shown below.
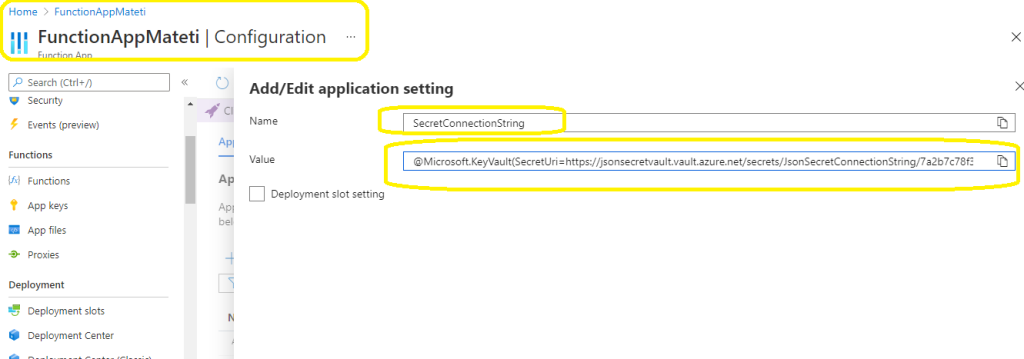
Step 18: By using above identifier create a new application settings in function app. Select function app we created and select Configuration blade from settings section. Then click on New Application settings.
By using identifier, construct below string and place it in the value field.
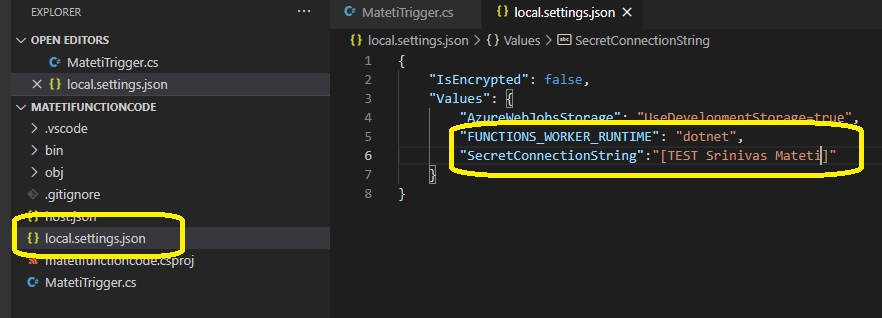
Step 19: Grab the name of the application setting we created in previous step and add it to local.settings.json file in function app
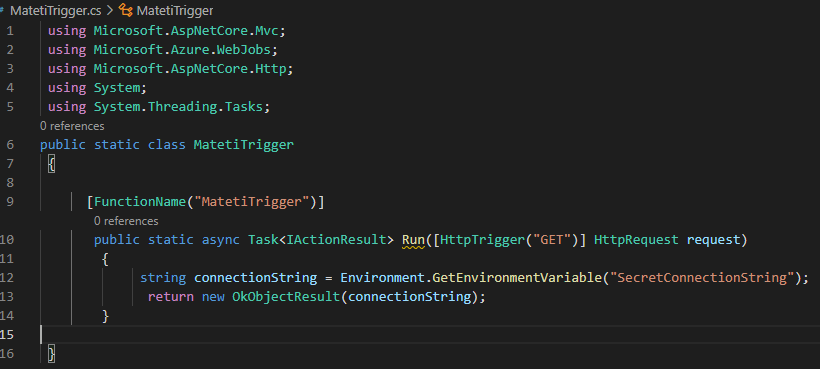
Step 20: Open Http Trigger we created earlier in step #16 and clear file content.
Step 21: The add below name spaces to the same file
using Microsoft.AspNetCore.Mvc;
using Microsoft.Azure.WebJobs;
using Microsoft.AspNetCore.Http;
using System;
using System.Threading.Tasks;
Step 22: Add a class name to the above file. Also add a run method to it. This run method will use the connection string we defined in local settings file and displays its value. After making all these changes, you code looks as shown below.
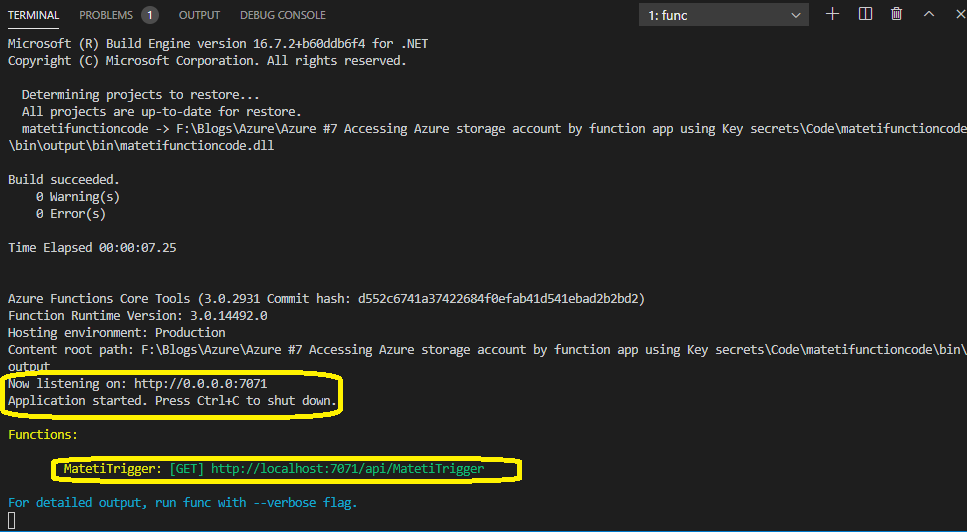
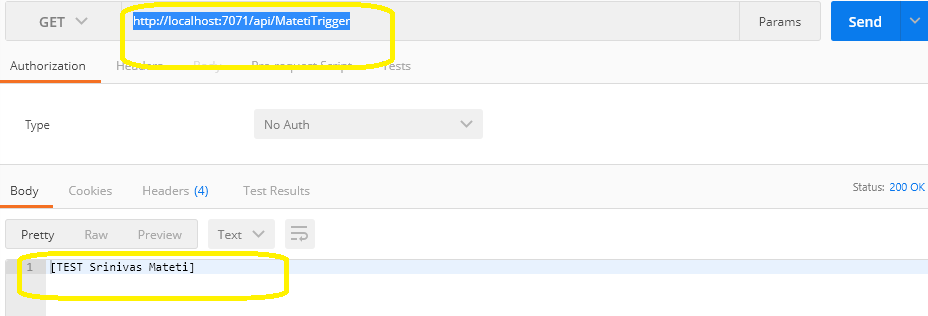
Step 23: Now we will do a local temporary deployment by using below command. This command will deploy function app locally
When you access the application you can see the value as shown in below image. This value has been picked up from local settings file. When you deploy this in to azure, it will display actual connection string
Step 25: Now its time to deploy this function app in to azure. As of now this function app need to read connection string from key vault and display the value. I am going to deploy this function app code into the function app we created in earlier steps.
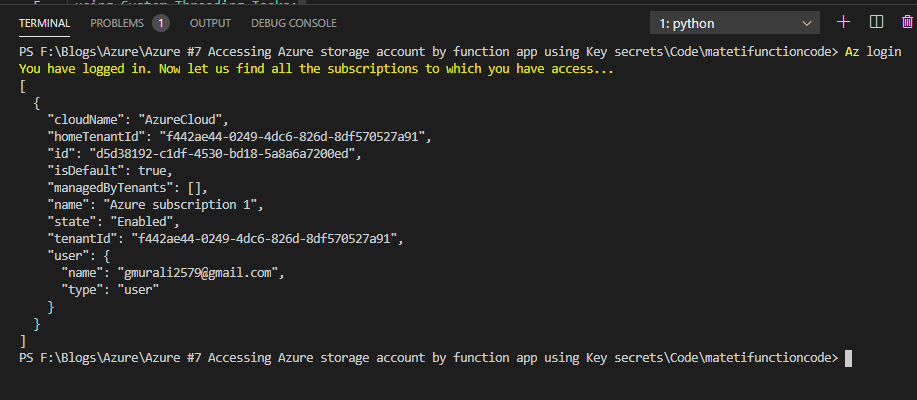
To deploy function app first, you need to connect to azure from visual studio terminal. You need to login to the same azure account when you created function app.
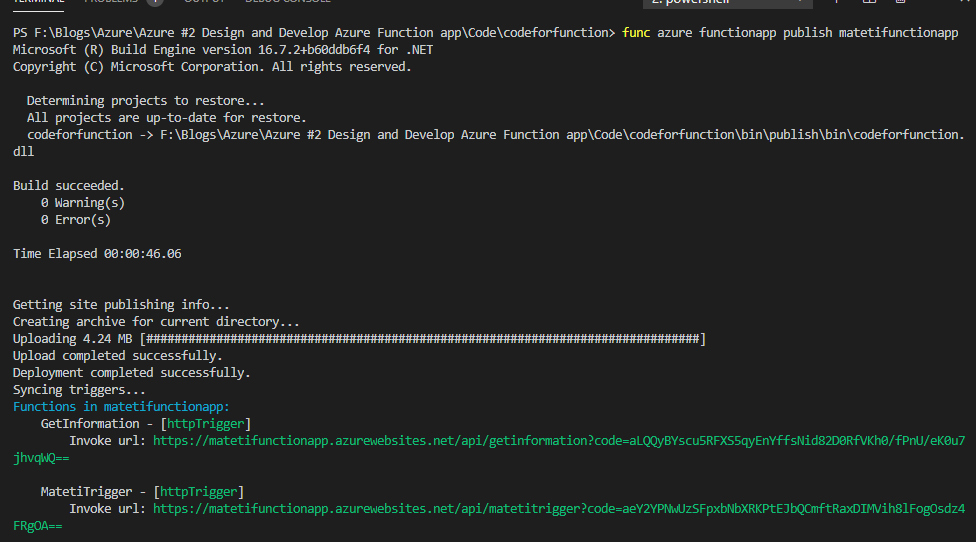
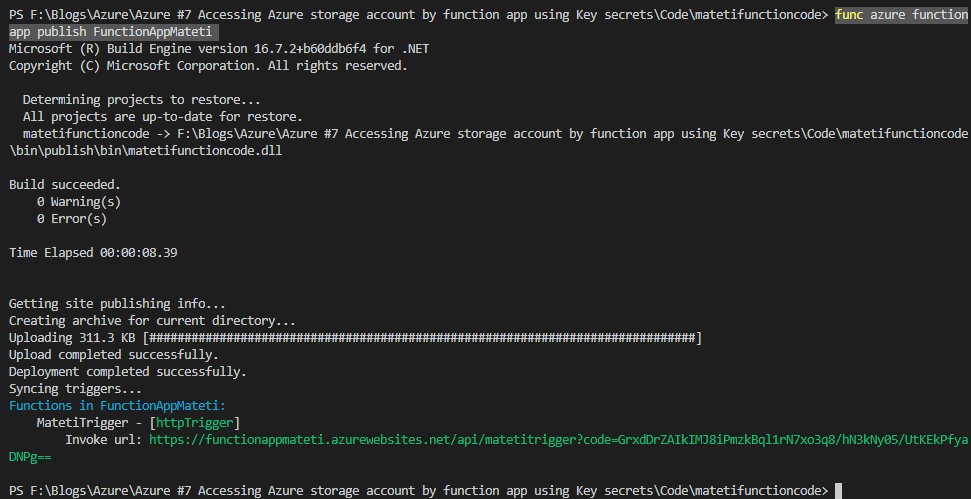
Step 26: After successful login execute below command. This command will deploy the code into the function app we created in azure
func azure functionapp publish FunctionAppMateti
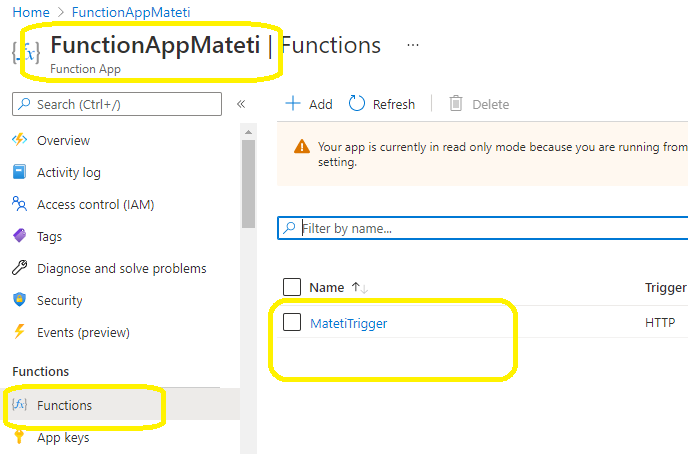
Step 27: Now its time to verify our function app. When we run function app from azure, it should display the connection string.
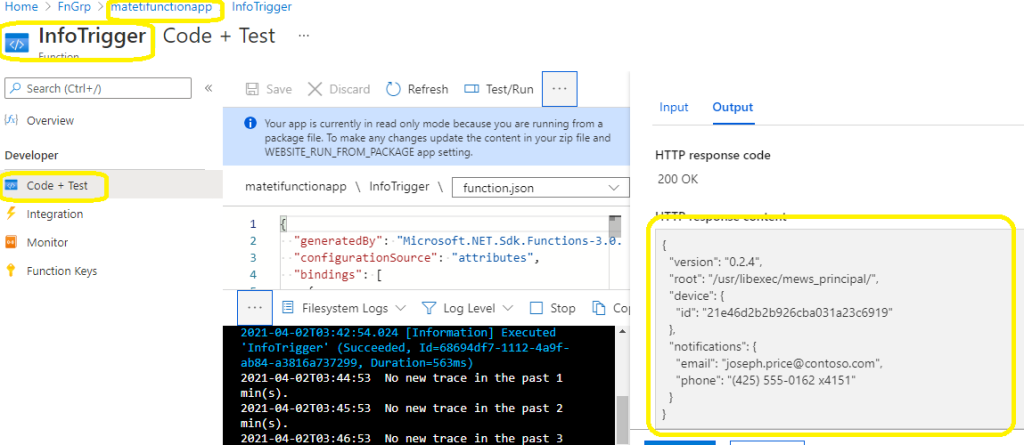
Select function app in azure and click on Function’s blade as shown below.
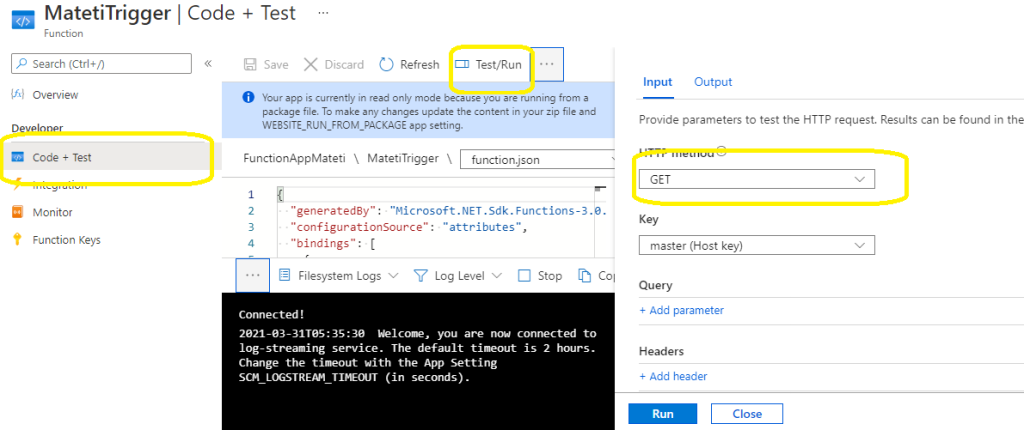
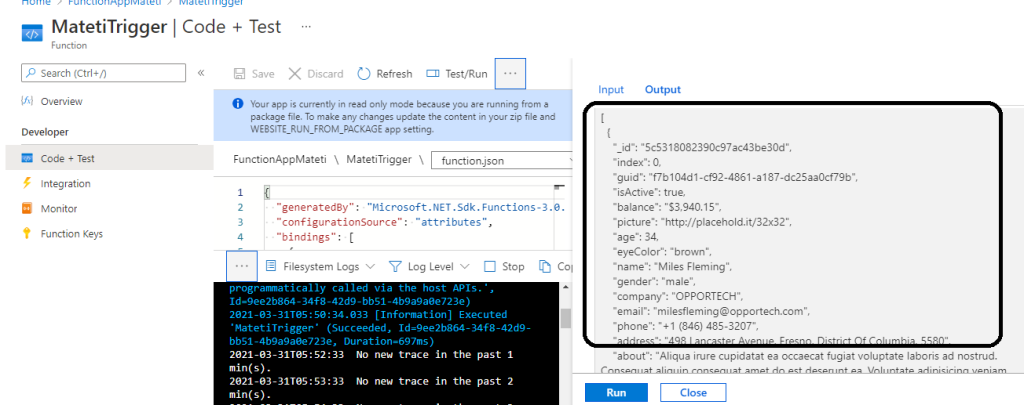
Step 28: Select the function app “MatetiTrigger” and Select “Code+Test” blade.
Then click on Test/Run tab, select Get option in HttpMethod drop down.
After that click on Run button. Your out put should be the connection string as shown below
Step 29: Our initial test of function app is working fine. However, function app is not simply used to read and display connection string. We will modify our function app to read blob container by using this connection string and retrieve the json file.
Go to visual studio terminal and execute below command. This will add required namespaces (which can be used to read blob information) to our function app application.
Title: Programmatically Creating, Accessing and Processing Azure Queue Messages
Introduction: All my articles are compiled into simple steps with detailed screen shots and elaborative description. By following these steps even, a novice programmer should be able to replicate scenario. Please go through the steps and provide your valuable feedback to make my next articles more clearer and intent.
Srinivas
Note: I took help of various internet sources while researching this item. Credit goes to internet and Microsoft communities. This is one of the topics in Azure certification.
This is my 10th article on Azure.
Please follow below links for my previous Azure articles
Step 3: After successful creation, please access the storage account go to access keys tab and collect the connection string. In later steps, we will use this value to access storage account by using dot net core application.
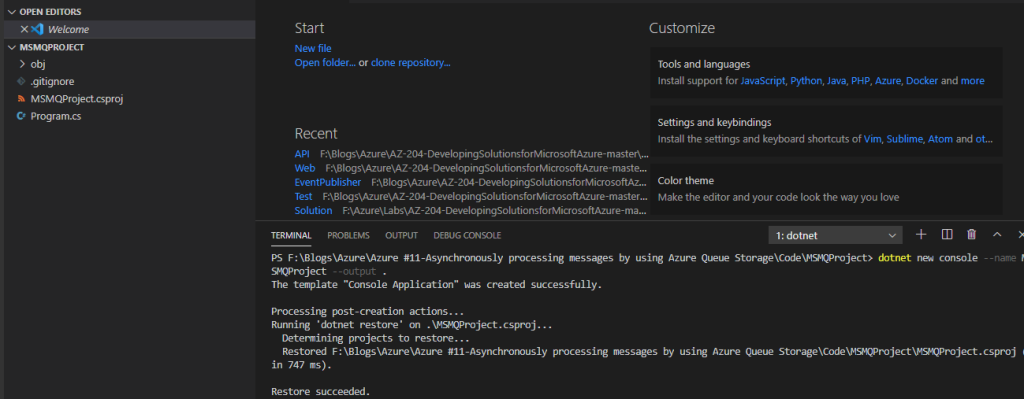
Step 4: Open Visual Studio and launch Terminal. Execute below command to create dot net core application.
dotnet new console –name MSMQProject –output .
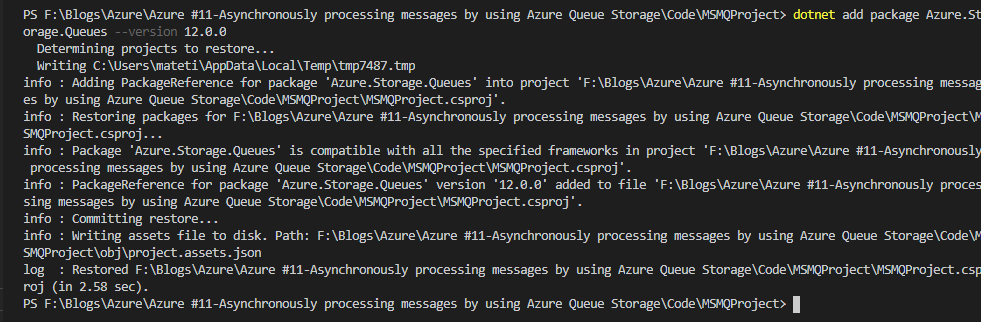
Step 5: By default classes and names spaces related to MSMQ will not be included to dot net core application. We need to install and import couple of packages by using nuget manager.
Step 6: Now run “dot net build” command to make sure packages get installed properly.
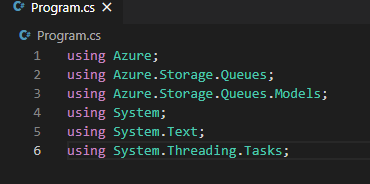
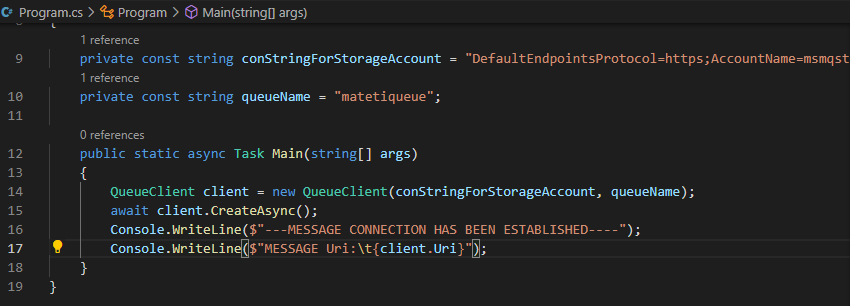
Step 7: All set for writing MSMQ code. Open Program.cs file and include name spaces related to MSMQ. Your name space section should be look like as below.
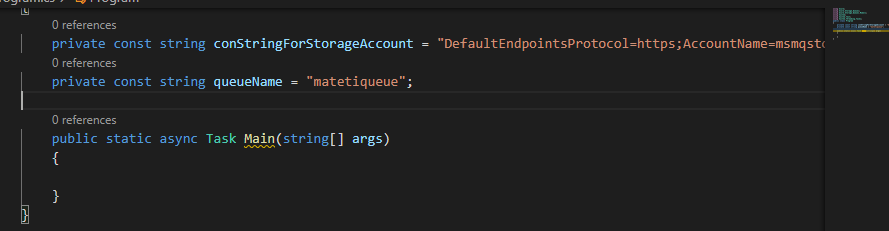
Step 8: Define 2 variables to store connection string and message queue name. And assign storage account string we collected step 3. Make sure queue name value in lower case.
Step 9: In this step, we are going to add logic which will access storage account and creates a queue if does not exists.
Create object of “QueueClient” and pass connection string and queue name as parameters.
Then call CreateAsync method which checks whether the queue exists or not. It will create the queue if does not exists. If exists, it will create connection for it.
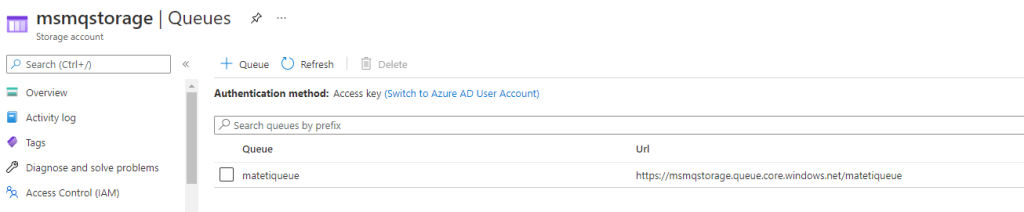
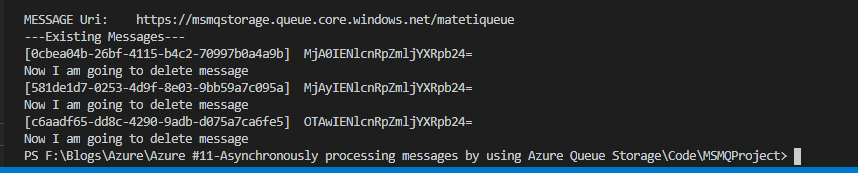
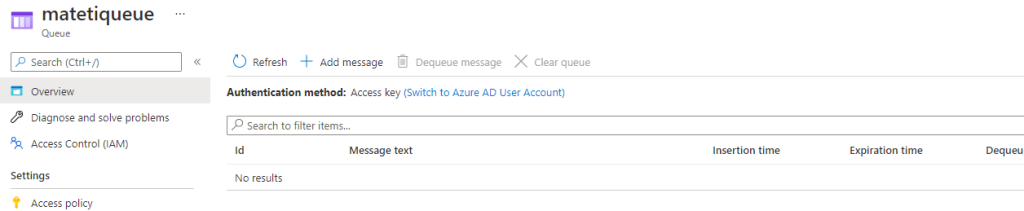
Step 10: Execute command “dotnet run” and check the console out put. Also go to Azure portal and verify whether queue created or not
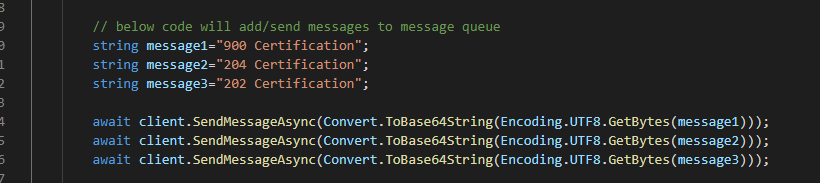
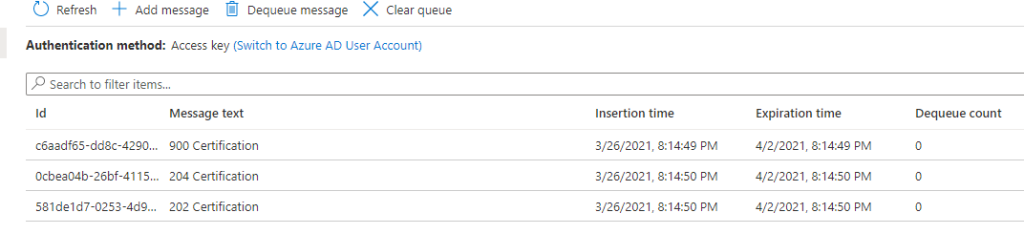
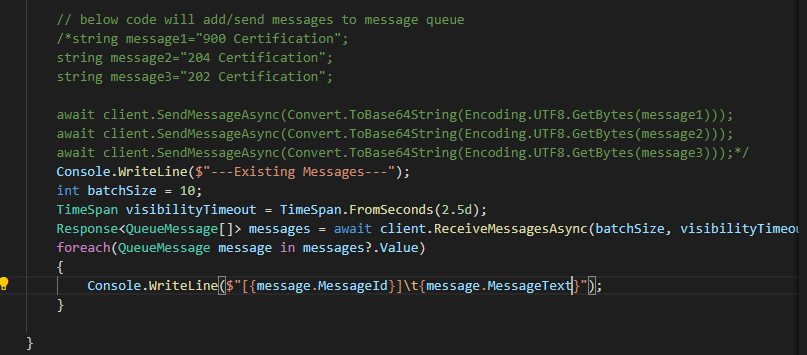
Step 11:Now we will Create messages by using core application by adding below lines of code.
Introduction: All my articles are compiled into simple steps with detailed screen shots and elaborative description. By following these steps even, a novice programmer should be able to replicate scenario. Please go through the steps and provide your valuable feedback to make my next articles more clearer and intent.
Note: I took help of various internet sources while researching this item. Credit goes to internet and Microsoft communities. This is one of the topics in Azure certification.
This is my 9th article on Azure.
Please follow below links for my previous Azure articles
Follow below mentioned 20 steps to Access Azure Blob Containers and process programmatically by using dot net code
After completing this blog, you will be able to do
Create Storage Account and Blob Containers
Create Program to access the storage account
Dot net logic to access blob containers
Create Blob container by using dot net program
Sample Description: We are going to create a dot net core application to access blog container. Able to create a blob container by using dot net application.
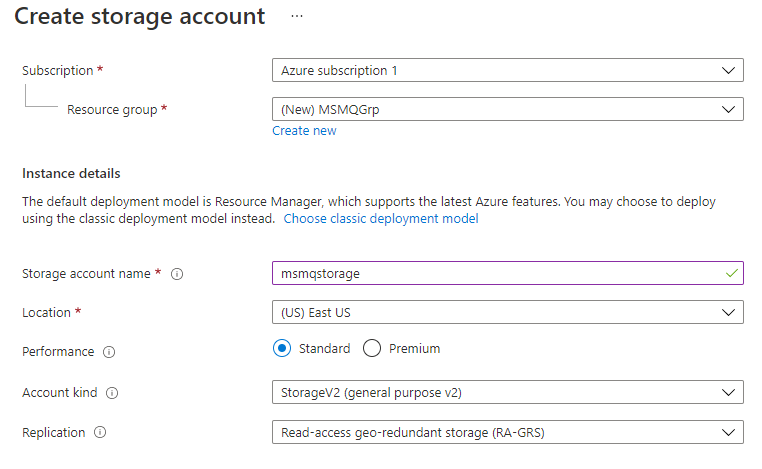
Step 2: Create a new Resource group in azure portal
Step 3: Create a new Storage Account.
Step 4: Create couple of Blob containers with in the above storage account. For more steps account storage account & Blob container creation, please visit my previous blog Click here
Step 5: Upload couple of images to newly created blobs
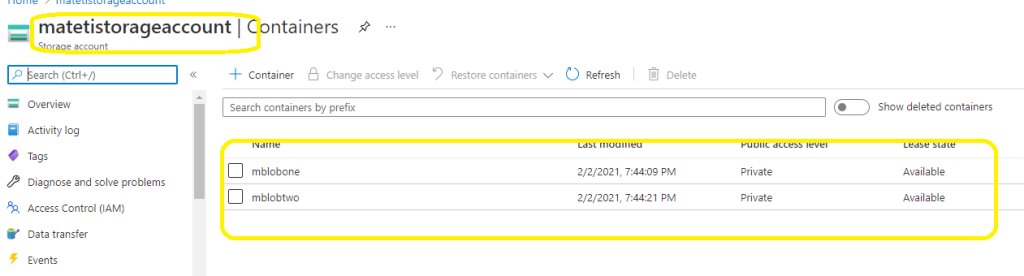
Step 6: Your storage account containers home page looks as below
Step 7: Now we need to grab couple of configurations from storage account
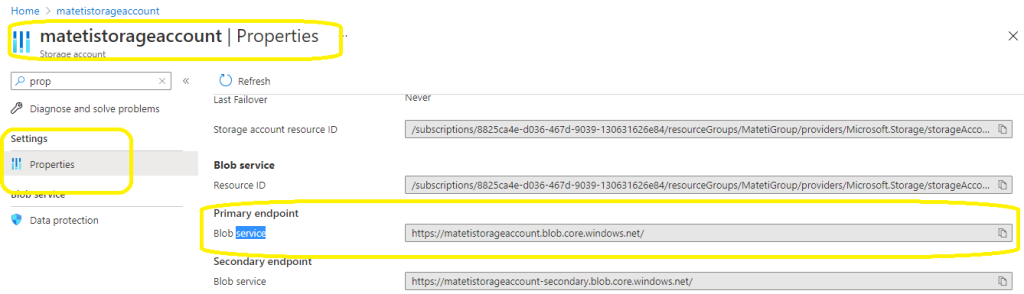
Go to Storage Account > Properties and grab the value from text box under Blob Service Primary End point. This value will be used to access your storage account
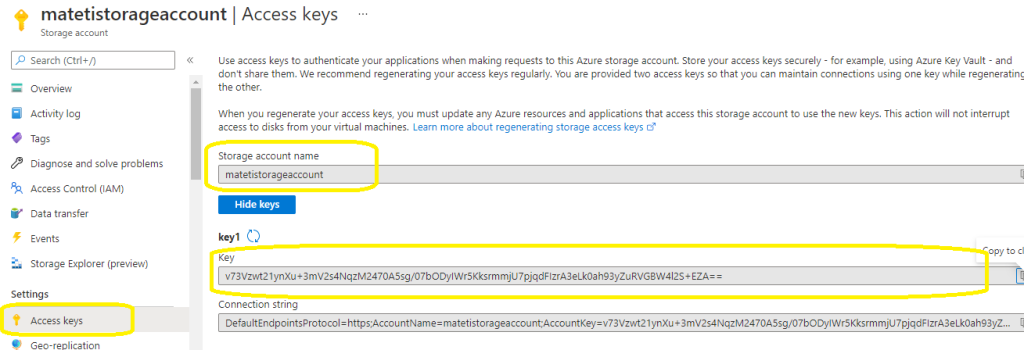
Step 8: Now go to access keys section and grab storage account name and value from key value from key1. These values will be used to access the storage account by using dot net code
Step 9: We are done with azure portal and now we need to work on dot net application.
Open visual studio code and open the folder where you want to create project.
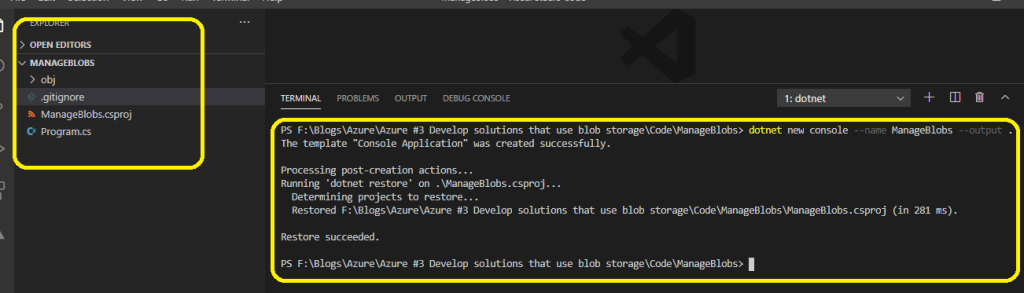
Open terminal and execute command “dotnet new console –name ManageBlobs –output .”
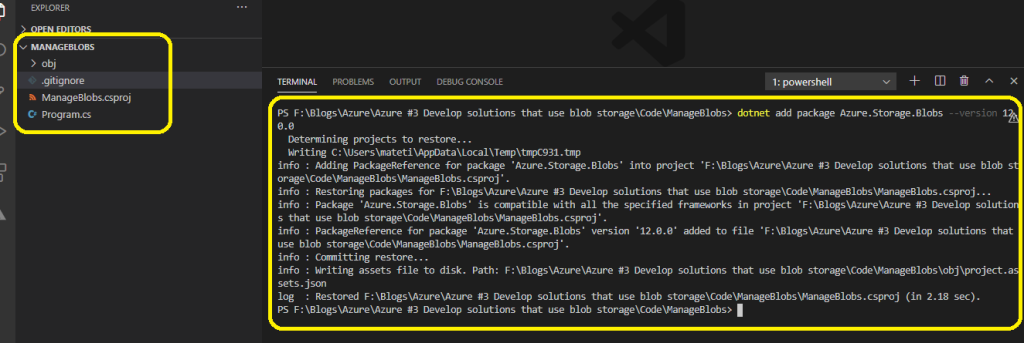
Step 10: Run below command to install package, which will install the components which can be used to access blob container programmatically
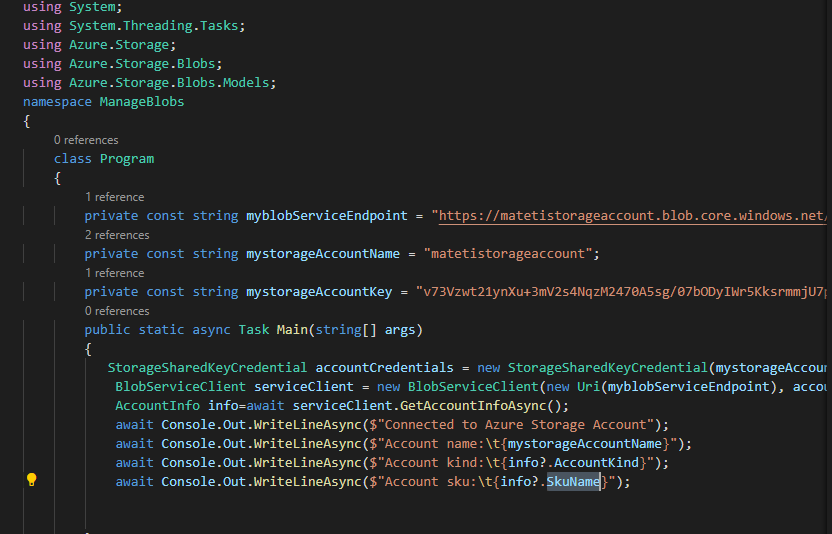
Step 11: First add below mentioned name spaces to Program.cs. These names spaces will provide access to the classes which can used to access Azure storage account and blob containner
using Azure.Storage;
using Azure.Storage.Blobs;
using Azure.Storage.Blobs.Models;
using System.Threading.Tasks;
Step 12: Declare 3 variables to store endpoint, storage account name and storage account key information at class level. Then assign the respective values we grab from Azure
Step 13: With in main method create object of “StorageSharedKeyCredential” class and pass storage account name and storage account key. This object will create credential set to connect to storage account
StorageSharedKeyCredential accountCredentials = new StorageSharedKeyCredential(mystorageAccountName, mystorageAccountKey);
Step 14 :Create object of “BlobServiceClient” and pass Service Endpoint and StorageSharedKeyCredential object we created in previous step. This will create a client end point to access the storage account (kind of web api call)
BlobServiceClient serviceClient = new BlobServiceClient(new Uri(myblobServiceEndpoint), accountCredentials);
Step 15: Now create object of “AccountInfo” class by calling GetAccountInfoAsync method on serviceClient object. This will retrieve storage account information from azure and assigns to info variable. Now by using info object you can retrieve information like AccountKind,SkuName, etc
AccountInfo info = await serviceClient.GetAccountInfoAsync();
Step 16: Now your code looks as mentioned below
Step 17: Now run your application and observe the output. Your application will access azure storage account by using its access key and end point and retrieve information.
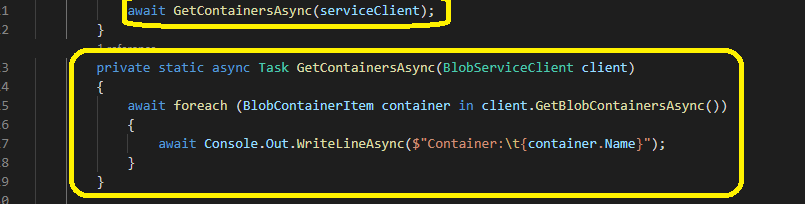
Step 18: Create a new method out side main and pass BlobServiceClinet as parameter. This method will navigate to the storage account> containers and access blob containers with in the storage account. Can access information of containers. Call this method from main
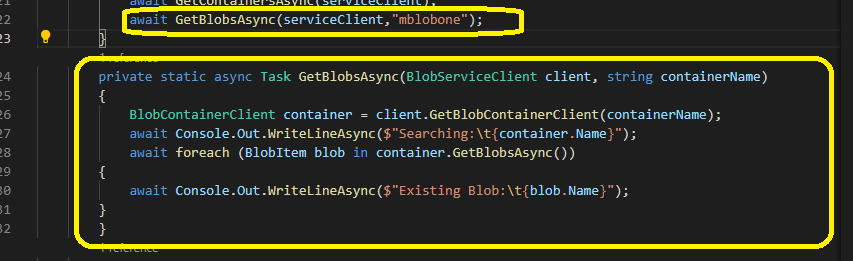
Step 19: Next I will create another method and will pass service client object and blob container name. This method will access the blob container and reads its items. Printing blob container item names.
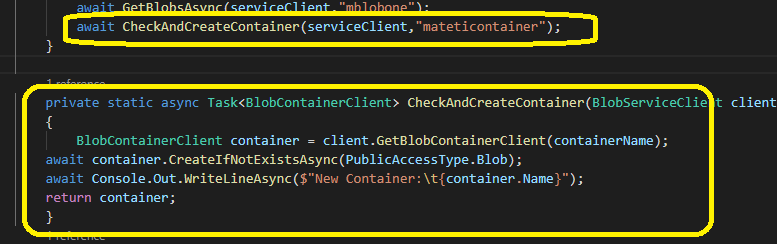
Step 20: Now created another method which will take service client and container name as parameters. This method will access the storage account and accesses the containers. Will check whether any container exists with the name or not. If does not exists, it will create a new blob container with the name.
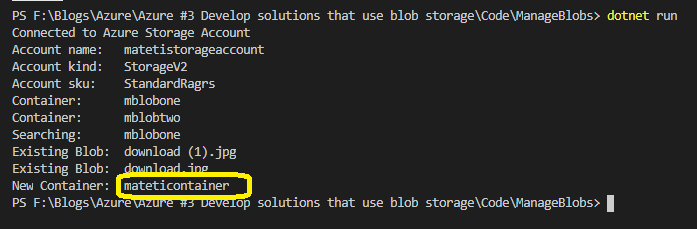
Step 21: Now run the application. First this application will access storage account and displays its information. Then it will through the containers and displays information about blob containers. Then it will go in to a specific blob container and reads its items. Finally, it will check and creates new container in Azure.
By Using above steps, you can access and process azure containers programmatically.
Introduction: All my articles are compiled into simple steps with detailed screen shots and elaborative description. By following these steps even, a novice programmer should be able to replicate scenario. Please go through the steps and provide your valuable feedback to make my next articles more clearer and intent.
Note: I took help of various internet sources while researching this item. Credit goes to internet and Microsoft communities.
This is my 8th article on Azure.
Please follow below links for my previous Azure articles
Step 2: Create New Azure Key Vault. Click on Create Resource > Search for Key Vault and Click on Create
What is Key vault: Azure Key Vault is a cloud service for securely storing and accessing secrets. A secret is anything that you want to tightly control access to, such as API keys, passwords, certificates, or cryptographic keys (From Microsoft).
Instead of using config files to store keys, we can use Azure key vaults. These are dynamic, secure and much controllable.
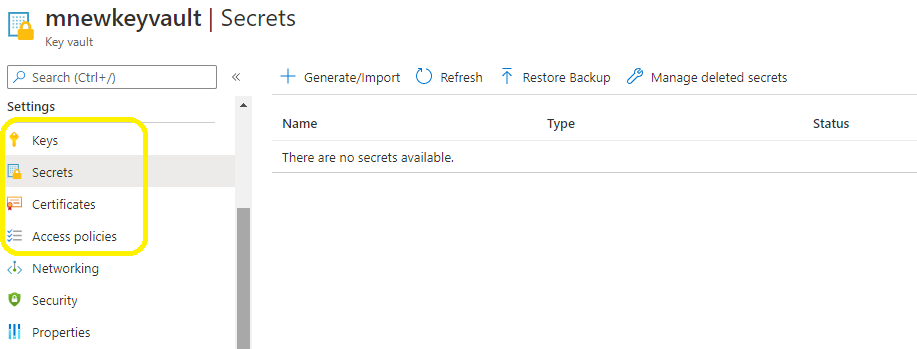
Step 3: We can store keys in key vault by using 3 ways – (a) Keys (b) secrets (c) certificates
In this article we are going to see how to create and share information by using secrets. We will also go through Access Policies.
Access Policies – Will allow key vault to provide and control its access to other applications like logic app, data factory, etc
Step 4: Now create a new Storage Account. After creating, Go to Access Keys section and grab the connection string.
Step 5: Create a new secret key with the connection string we copied from previous step.
Step 6: By using above secret key, we are going to access the Storage account.
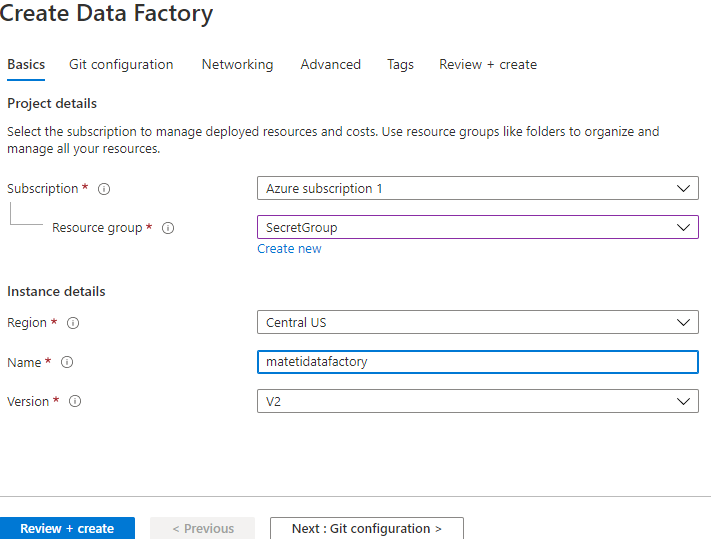
Now create a Azure Data factory and connect to the storage account by using the secret key.
What is Azure Data Factory -Azure Data Factory is a managed cloud service that’s built for these complex hybrid extract-transform-load (ETL), extract-load-transform (ELT), and data integration projects.
Create Resource> Search for Data Factory >Create
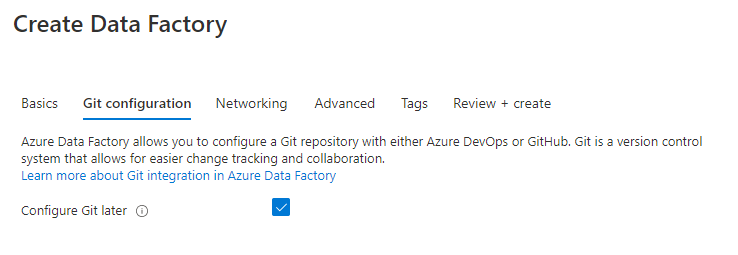
Step 7: In next tab, Check “Configure Git Later” check box. We are not going to map any code in this article. This option can be used when data factory dealing with code
Step 8: After creating Data Factory, launch it and click on “Author & Monitor” button on home page- it will open Data Factory Interface. Click on Managebutton on left side menu and create a new Linked Service
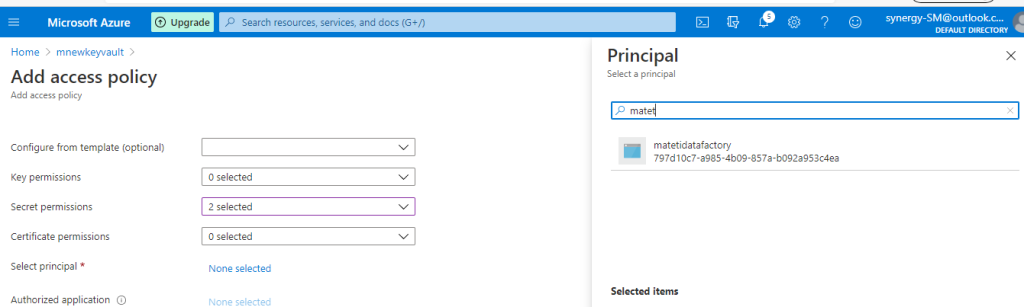
Step 9: Before going further, go to Key vault and create access policy for Datafactory
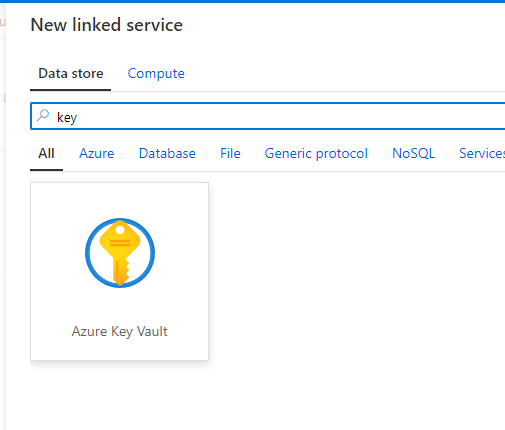
Step 10: Now go back to data factory and create a new link service. First we need to create a linked service to get access to key vault.
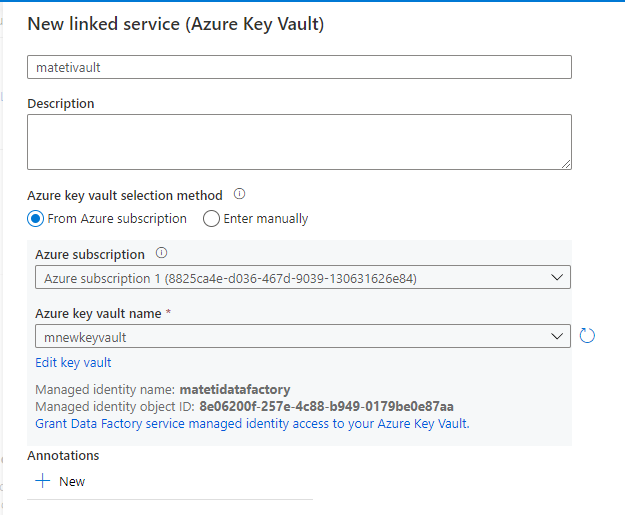
In new Link service screen search for key vault and select
Step 11: Provide all the required information, select key vault populated and create a linked service. This linked service will provide access to the key vault.
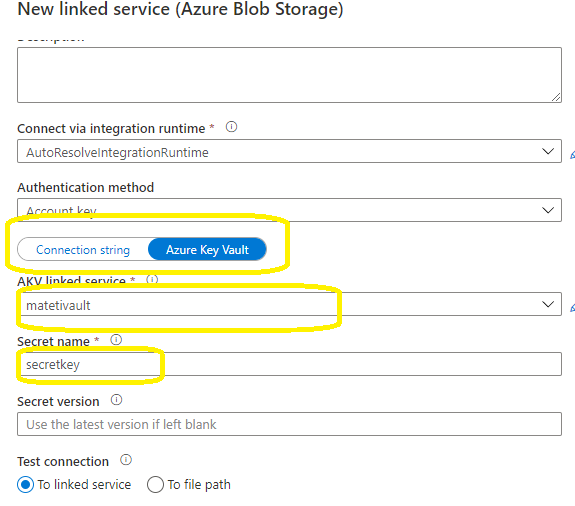
Step 12: Create another new linked service. This linked service will be used to connect to the Azure Blob. Search for azure blob and continue.
IN next screen select Azure key vault instead of Connection string. That means now you are connecting to azure blob by using a secret key from vault.
IN AKV linked service select the linked service we created earlier, which gives access to the key vault.
In secret name section give the secret we created in key vault section.
And finally click on create . This data factory will be connected to Azure blob by using a secrete key.
In next articles, we will see how to use secret keys in dot net applications.
Introduction: All my articles are compiled into simple steps with detailed screen shots and elaborative description. By following these steps even, a novice programmer should be able to replicate scenario. Please go through the steps and provide your valuable feedback to make my next articles more clearer and intent.
Note: I took help of various internet sources while researching this item. Credit goes to internet and Microsoft communities.
This is my 7th article on Azure.
Please follow below links for my previous Azure articles
Step 2: Create New Azure Key Vault. Click on Create Resource > Search for Key Vault and Click on Create
What is Key vault: Azure Key Vault is a cloud service for securely storing and accessing secrets. A secret is anything that you want to tightly control access to, such as API keys, passwords, certificates, or cryptographic keys (From Microsoft).
Instead of using config files to store keys, we can use Azure key vaults. These are dynamic, secure and much controllable.
Step 3: We can store keys in key vault by using 3 ways – (a) Keys (b) secrets (c) certificates
In this article we are going to see how to create and share information by using secrets. We will also go through Access Policies.
Access Policies – Will allow key vault to provide and control its access to other applications like logic app, data factory, etc
Step 4: Go to the Key vault we created and Click on Secrets> Generate/Import button to create a new secret key
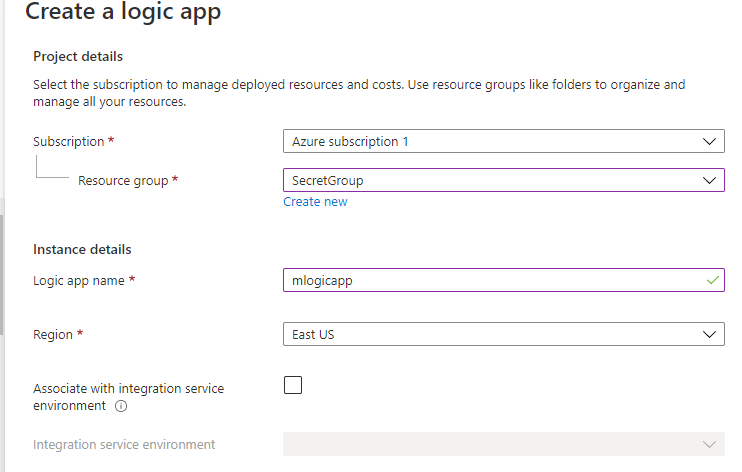
Step 5: In this step we will create a new logic app. This logic app will read the secret key from key vault in next step.
Click on Create Resource, search for Logic app to create a new logic app.
To know more about logic apps, please click on Link
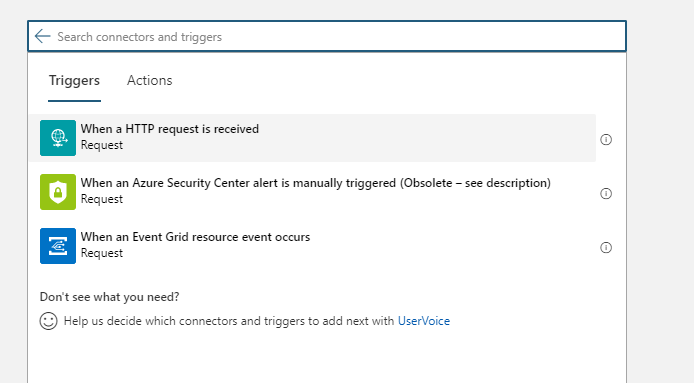
Step 6: Go to the logic app we created earlier and select new Blank app, app designer will be launched
Select Request and select “When a http request is received” trigger
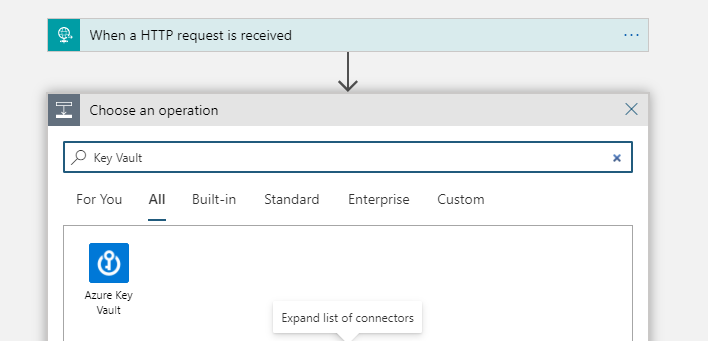
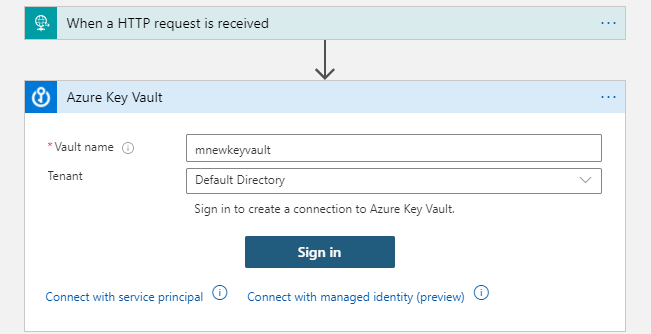
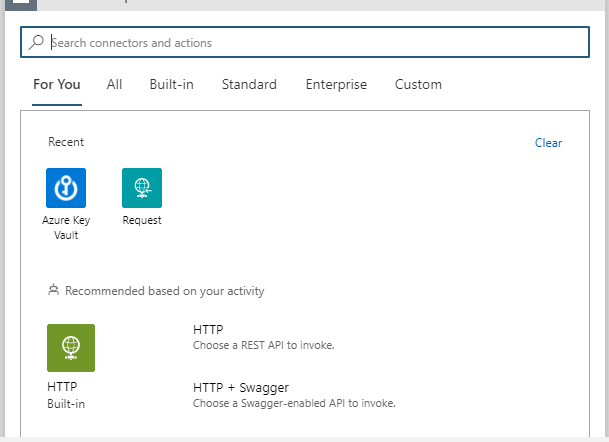
Step 7: After adding 1st step as mentioned above, now click on next step> search with key word “key vault”> Select Azure Key Vault
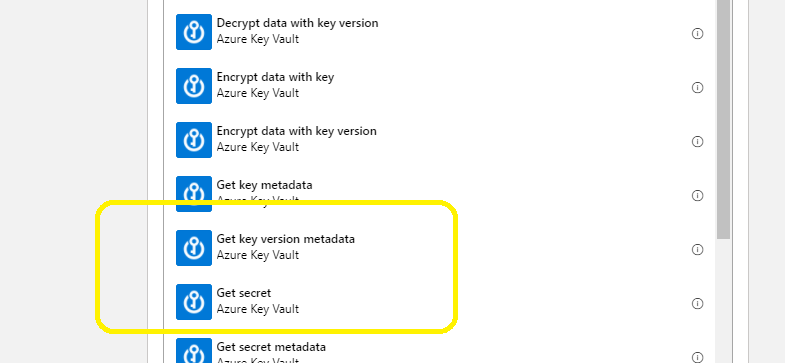
Step 8: Select Get Secret action from the list
Step 9: Give the key vault name we created earlier and click on sign in. It will ask you to authentication.
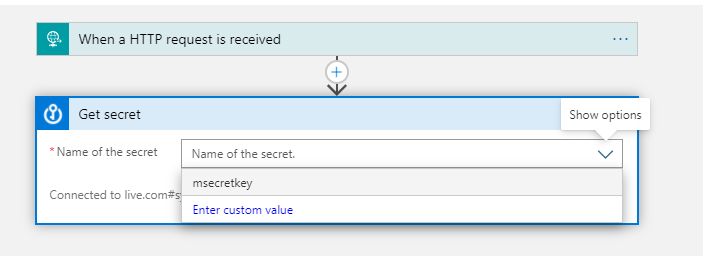
Step 10: Once the authentication completed, it will give access to the keys, secrets and certificates we created with in the key vault. Select the secret key name we created to read the value.
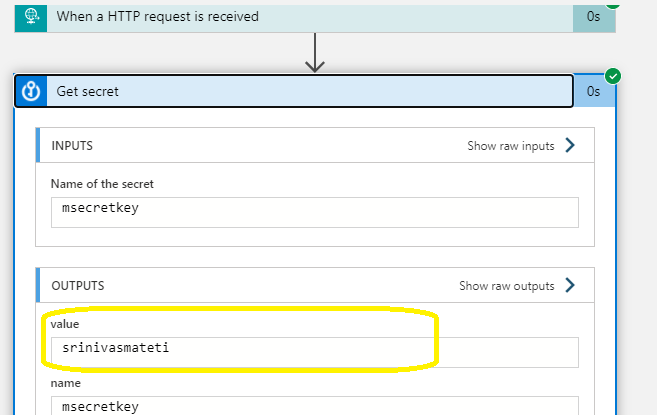
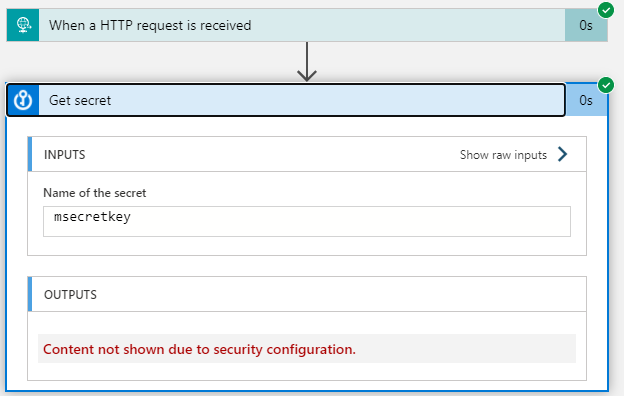
Step 11: Save your Logic app and run. This logic app will access the secret key we created and fetches the key value
You can see the value “srinivasmateti” has been pulled from the secret key. But displaying secret keys on screen is not secure. We need to perform below steps to make it more secure.
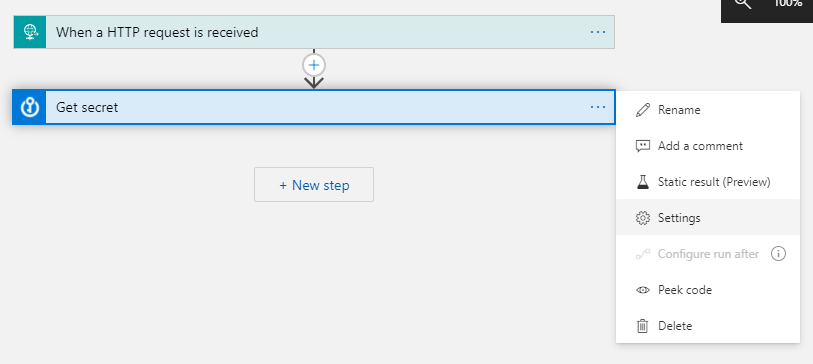
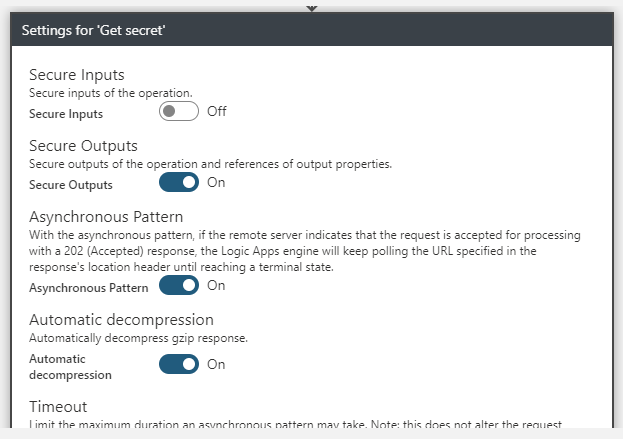
Step 12: Click on 3 dots against to the 2nd step of logic app and click on settings
Step 13: Enable Secure Outputs from the list and save
Step 14: Now save your logic app and run. You will receive below error. To fix this issue, we need to perform below steps from key vault side
Step 15: Now we need to create a access policy in key vault to provide access to this logic app.
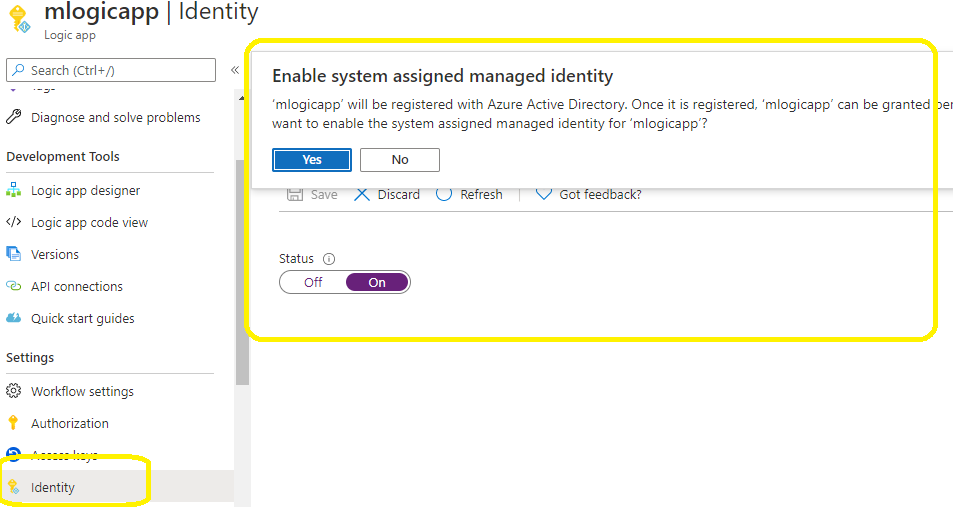
Before creating an access policy, we need to enable identity for Logic. This will allow Key vault to access logic app and provide access
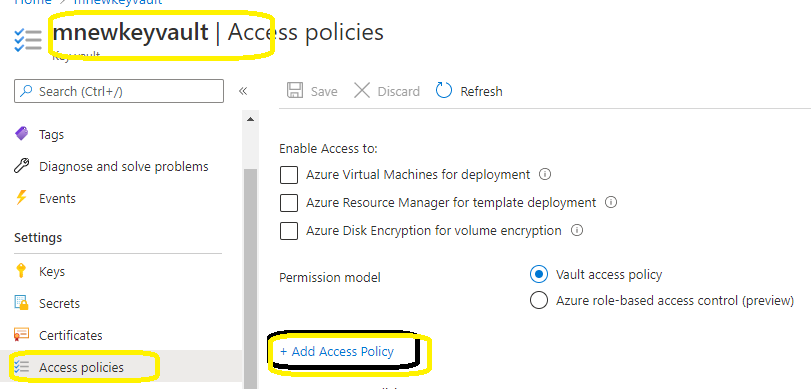
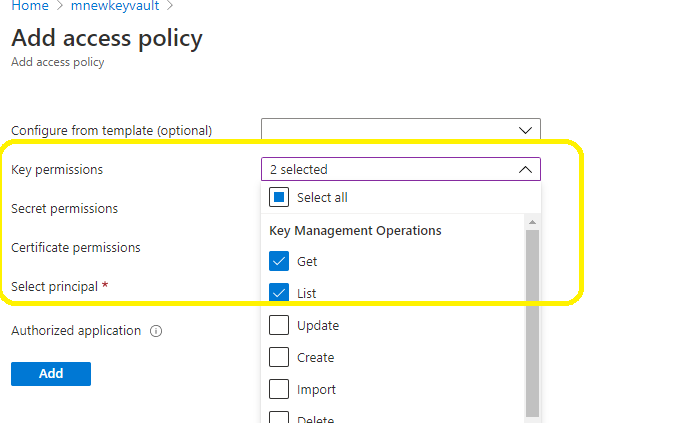
Step 16: Go to Key vault> Click on Access Policies > Add Access Policy
Step 17: Expand key permissions drop down and select the required options. Here I am selecting Get & List because I need to perform read option.
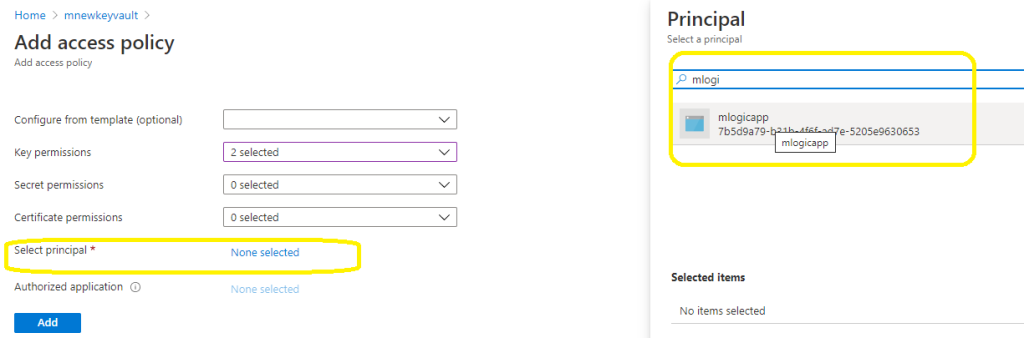
Step 18: Click on Select Principal > Search for the logic app and select
Step 19: And click on Add. It will create a new access policy to provide access to Logic app. Do not forget to click on final save
Step 20: Go to Logic app designer, delete 2nd step. Now we are going to access secret key in more secured way. By using Managed Identity Logic app will make an api call and get the key value
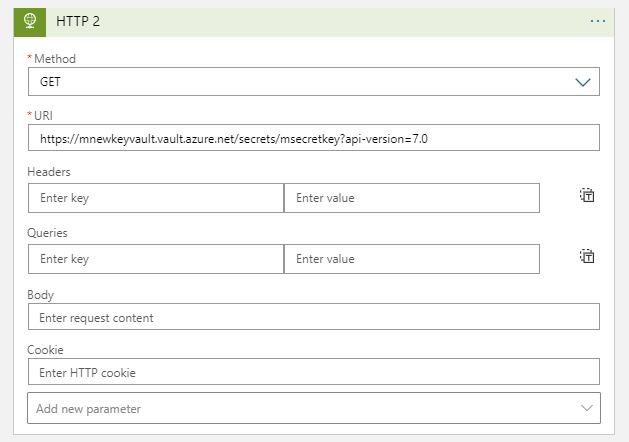
Add a new step > select Http Action from the list
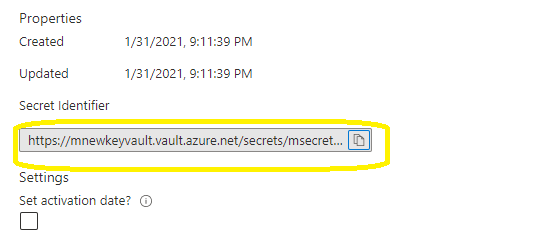
Step 21: Go to Secret we created and grab the secret identifier from text box
Step 22: Below is the secret key we copied from text box
Modify the above key. Remove content after msecretkey(it will give access to the specific key we created). The above is a URL and our logic app is going to make a web api call. To retrieve latest active key change the url as below
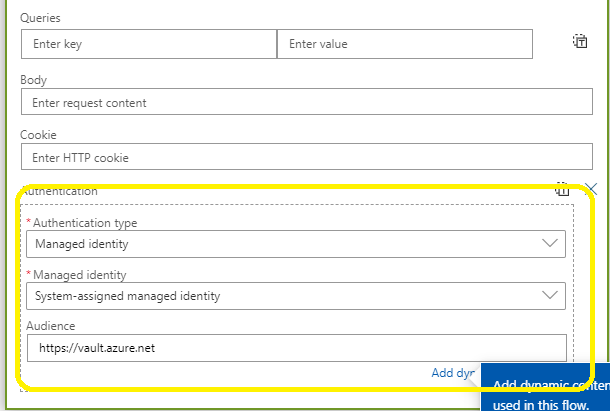
Step 23: We need to authenticate. Add a new parameter, select authentication and select Managed Identity as value. Also set audience value to “https://vault.axure.net “
We are going to authenticate this call by using Managed Identity
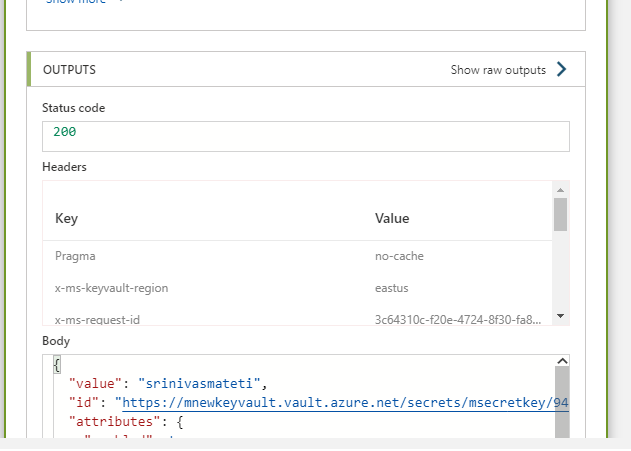
Step 24: Save Logic App and Run
In above step, logic app made an api call to Secret value using Managed Identity and get the value as response body. In general development mode, by using Managed Identity only we will retrieve the value from key vault.
In next articles we will see more dot net samples which deals with key vaults
Introduction: All my articles are compiled into simple steps with detailed screen shots and elaborative description. By following these steps even, a novice programmer should be able to replicate scenario. Please go through the steps and provide your valuable feedback to make my next articles more clearer and intent.
Note: I took help of various internet sources while researching this item. Credit goes to internet and Microsoft communities.
This is my sixth article on Azure.
Please follow below links for my previous Azure articles
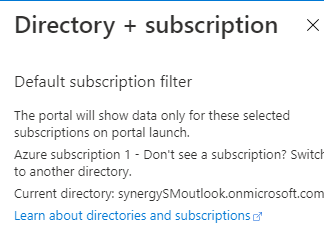
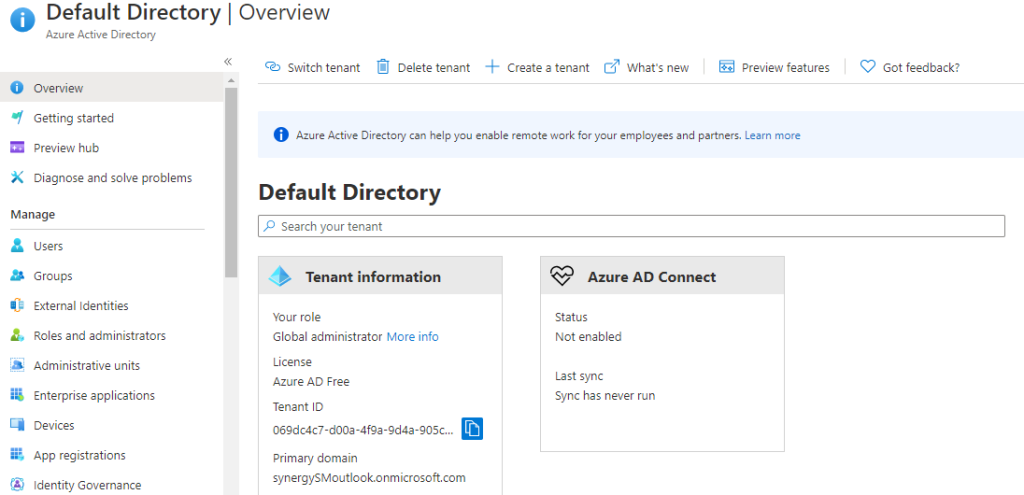
Step 2: Every azure account will have a default AD. Click on your profile at right upper corner and select “Switch Directory” option. Your default directory will be displayed and currently you logged in to it.
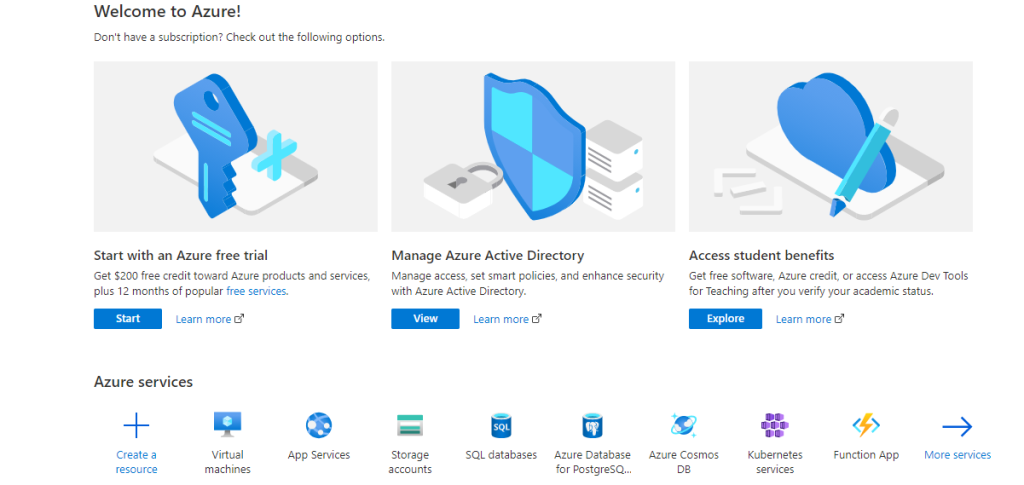
Step 3: Now we will create a new active directory. Either Click on Azure Active Directory Icon on home page or Click on Create Resource and select Azure Active Directory- Your default directory will be loaded
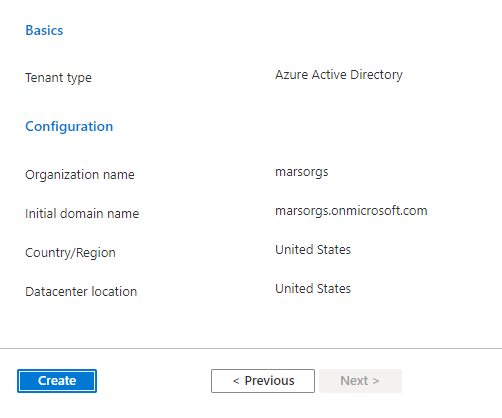
Step 4: Click on Create Tenant option and create your own Azure Active Directory
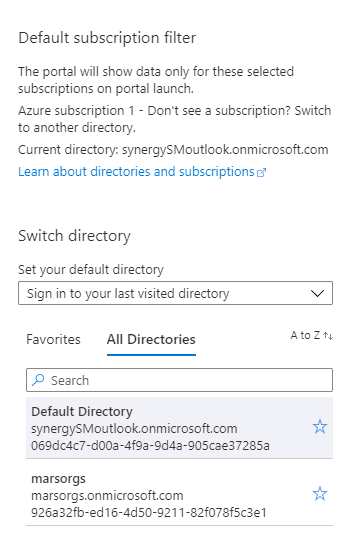
Step 5: New Active Directory has been created with name marsorgs. Now click on switch directory on your profile. 2 Active directories will be available.
Step 6: Select new AD and your login active directory will be changed. As this is a new AD, you will not have access to all your resources. You can access only AD here in this profile.
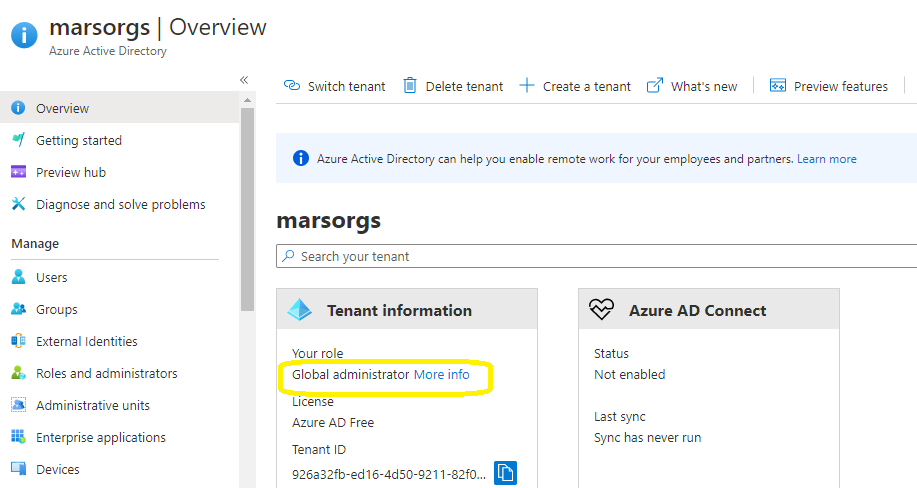
Step 7: From left side menu, select Azure Active Directory-marsorgs AD will be loaded. As you are the system administrator, role will be displayed as Global Administrator
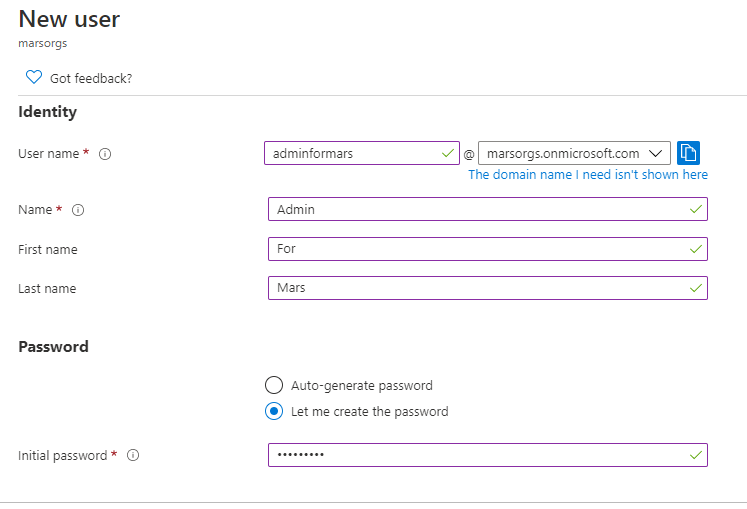
Step 8: Now we will create couple of users in this AD and see the different roles. Click on Users > New User link to create a new user
We will create 2 users and assign the roles later. 1 user will be admin and other will be normal user
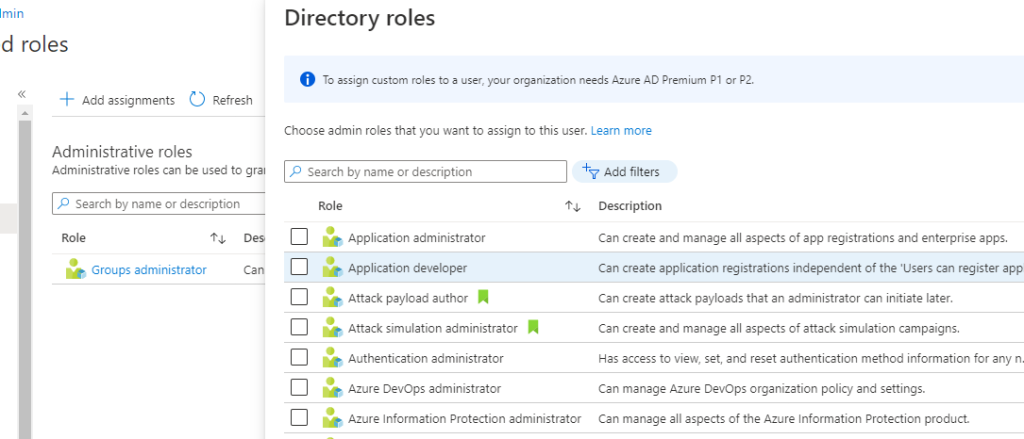
Step 9: We created 2 users, now we will assign the roles. Select User, Click on Assigned Roles. No roles will be displayed as we do not assign any roles. Click on Add Assignment and assign one role. Review the role names and its descriptions.
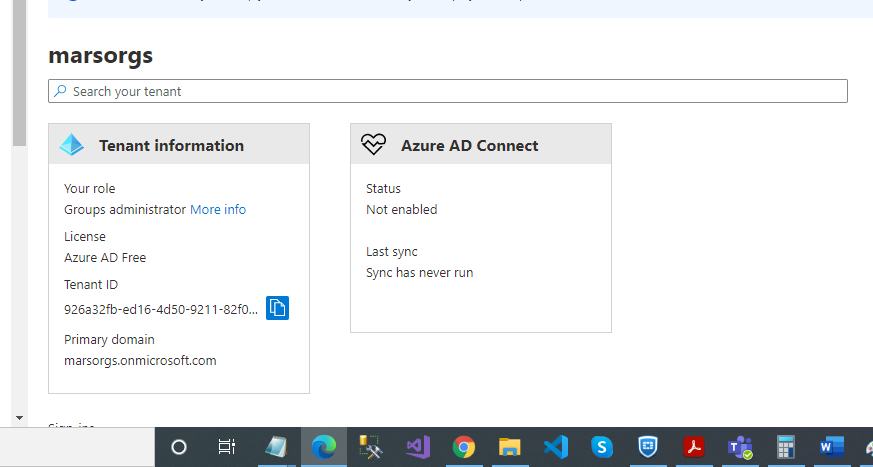
Step 10: Now login with both users and observe the profile and homepages. For both the users marsorgs will be the default directory, they do not have access to other resources except Active Directory. Both the users cannot delete the existing Active Directory, but they can create new active directory with in. Please check the roles against the users. Both the users can only create a new guest user